

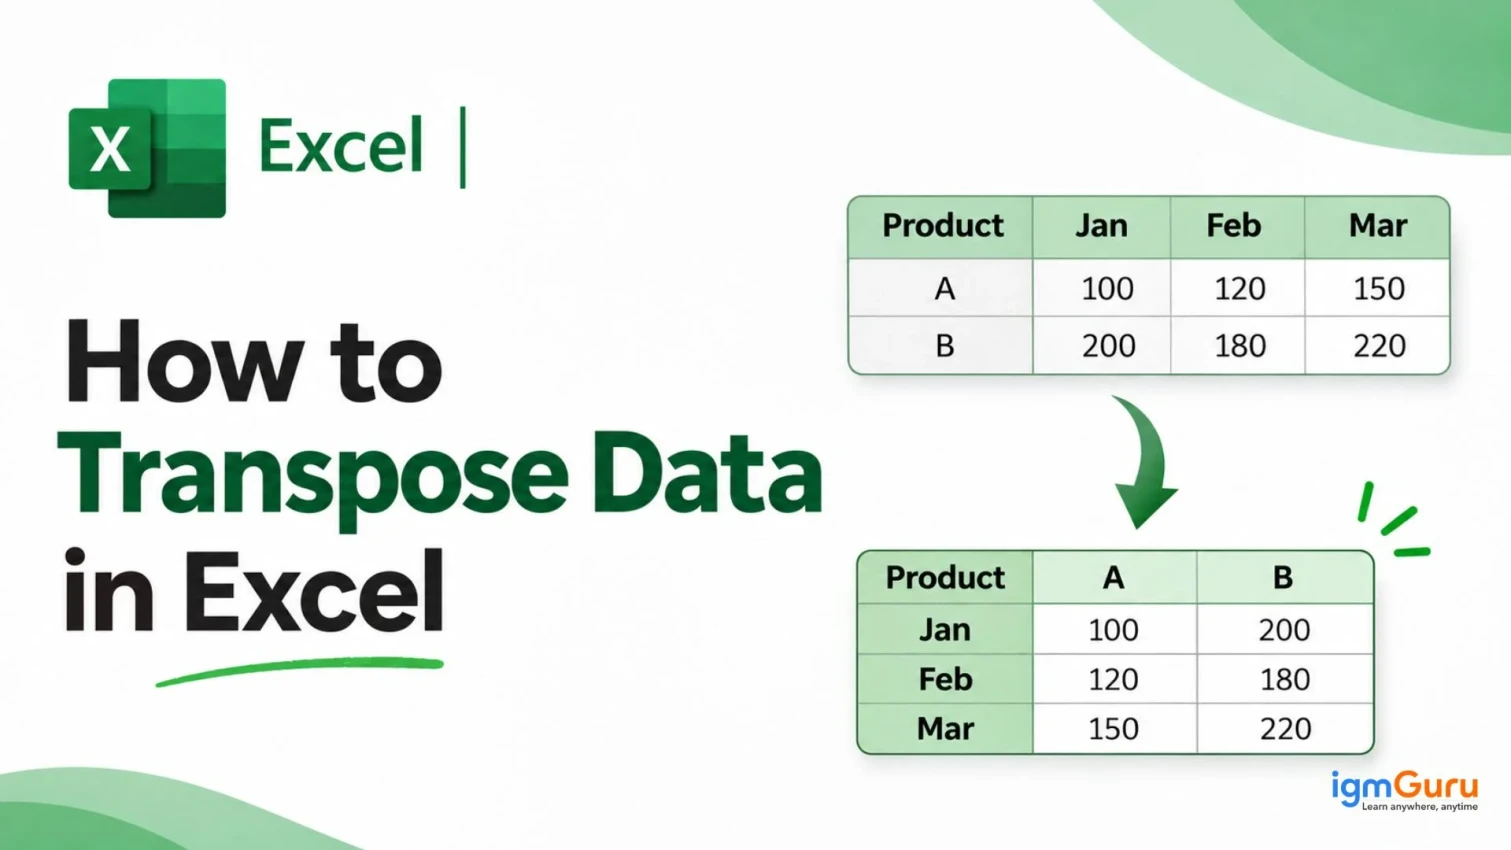
You open a sheet and find the months running down the page. Your report needs them across the top. Retyping everything would take forever and you might make some mistakes.
Excel solves this problem in seconds. In this guide, you will learn how to transpose data in Excel with three reliable methods. You will also see how to handle rows, columns and full tables and how to avoid the most common errors.
Let’s get into it!
Excel have several ways from which you can transpose your data, but if you want the quickest way, here it is:
I use Excel every day and I am always discovering new ways to make working with data easier. If you are curious, this blog shares a few handy ways to transpose your data that you can explore at your own pace.
Develop advanced Excel skills in formulas, data analysis, PivotTables, dashboards, and reporting through practical training.

Transposing in excel simply means when you change your rows to columns and your columns to rows. It rearranges your data by switching its direction while keeping all the original information unchanged.
Transposing data changes its layout by converting rows into columns and columns into rows. The first row becomes the first column, the second row becomes the second column, and the pattern continues for the remaining data.
Here is a small example. This table shows headcount by department:
| Department | January | Febuary | March |
| Sales | 12 | 14 | 15 |
| HR | 5 | 5 | 6 |
| IT | 9 | 10 | 10 |
| Finance | 7 | 7 | 8 |
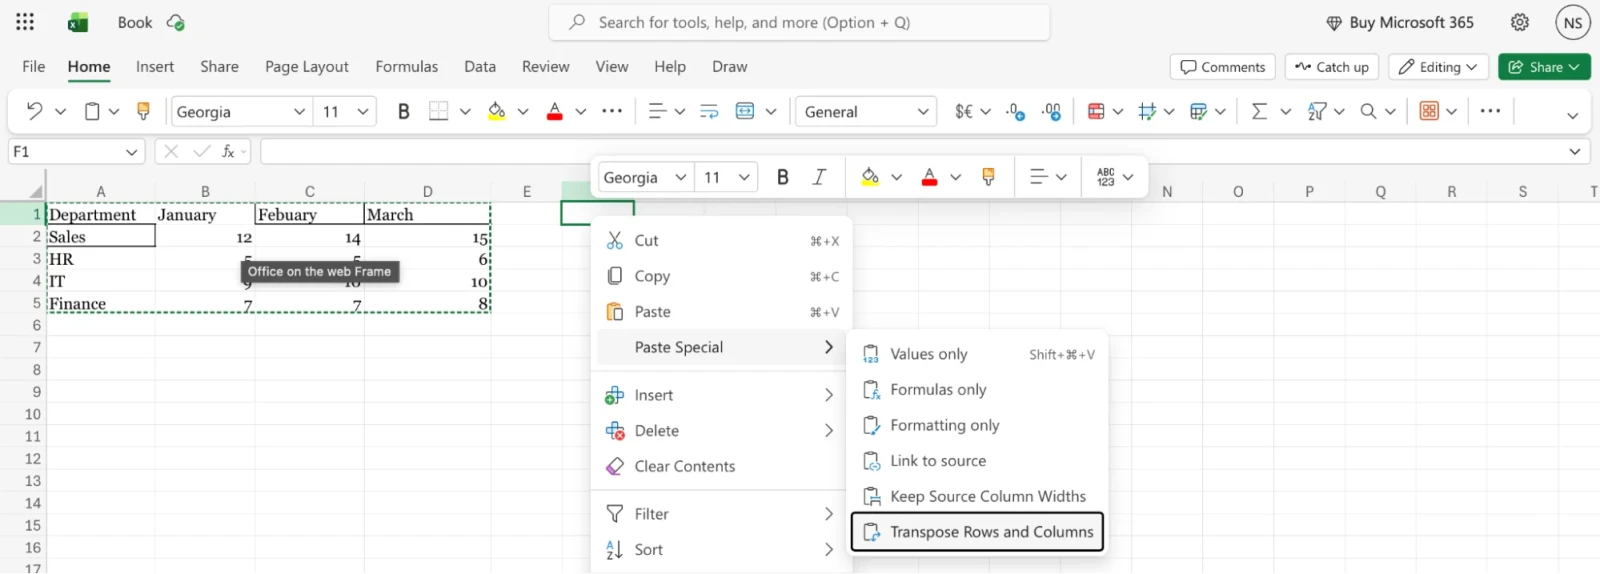
After you transpose it, the departments run across the top and the months run down the side:
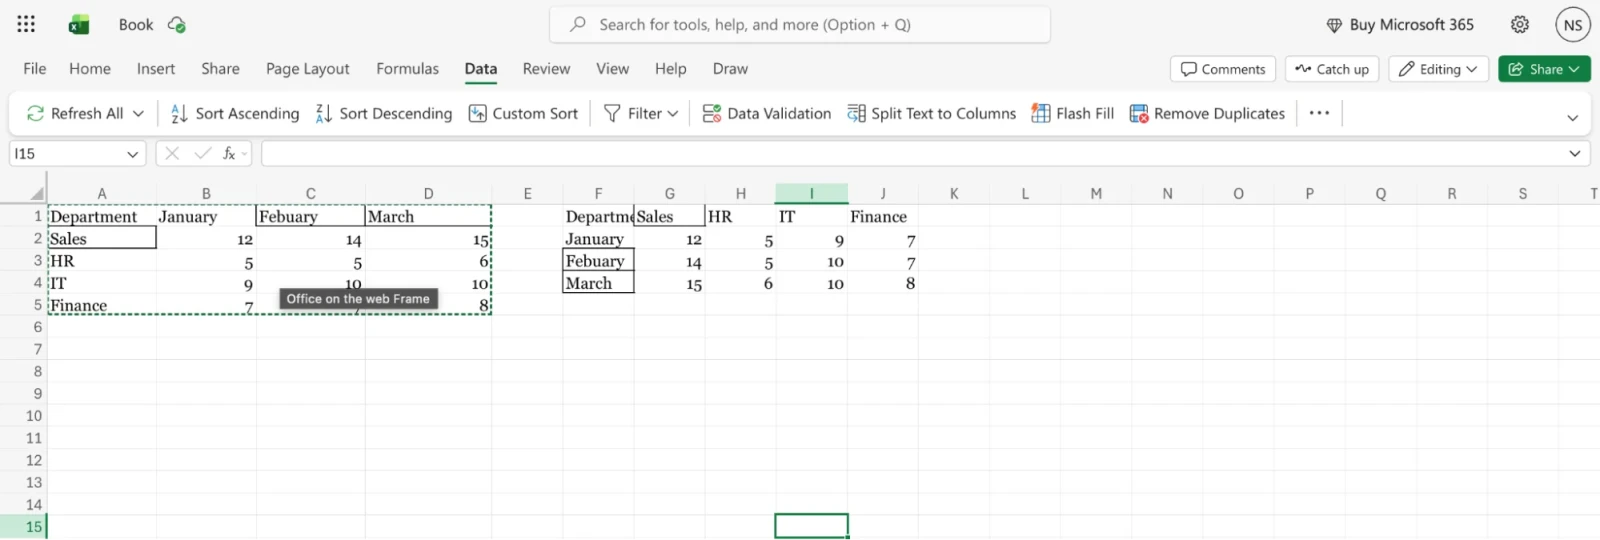
The numbers are the same. Only the direction has changed.
Read Also: Pie Chart in Excel
You can rearrange data in Excel using three different approaches, which mainly depends on your needs and how you want to work with your data.
I will use the same table that I have explained above, placed in cells A1:D5. Each method suits a different situation.
Paste Special is the fastest way to transpose in Excel. It makes a one-time copy of your data in the new direction.
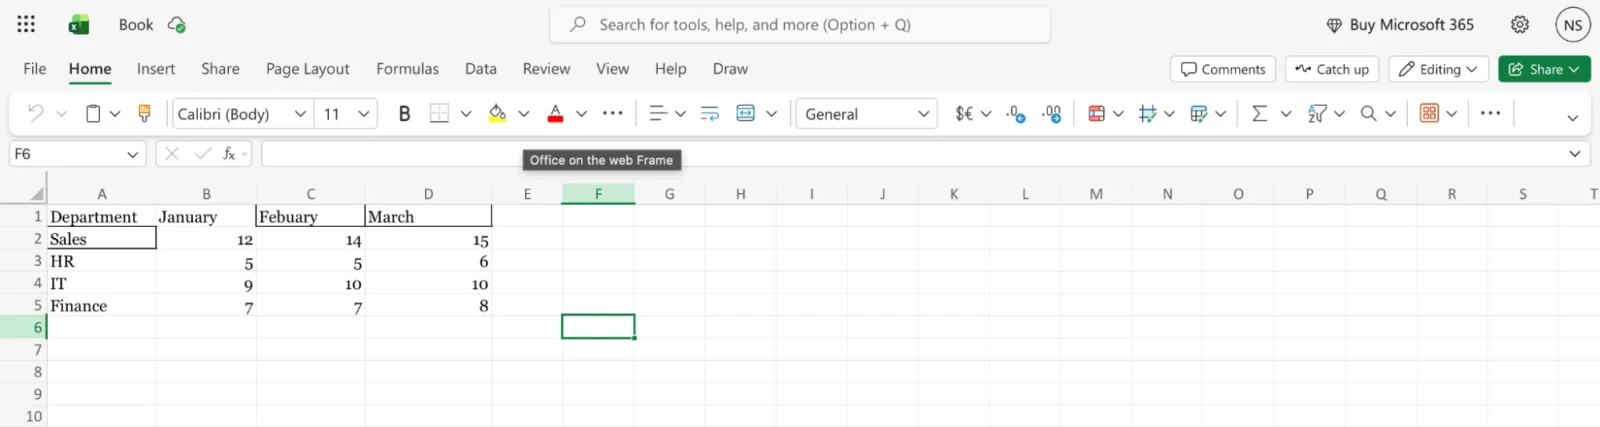
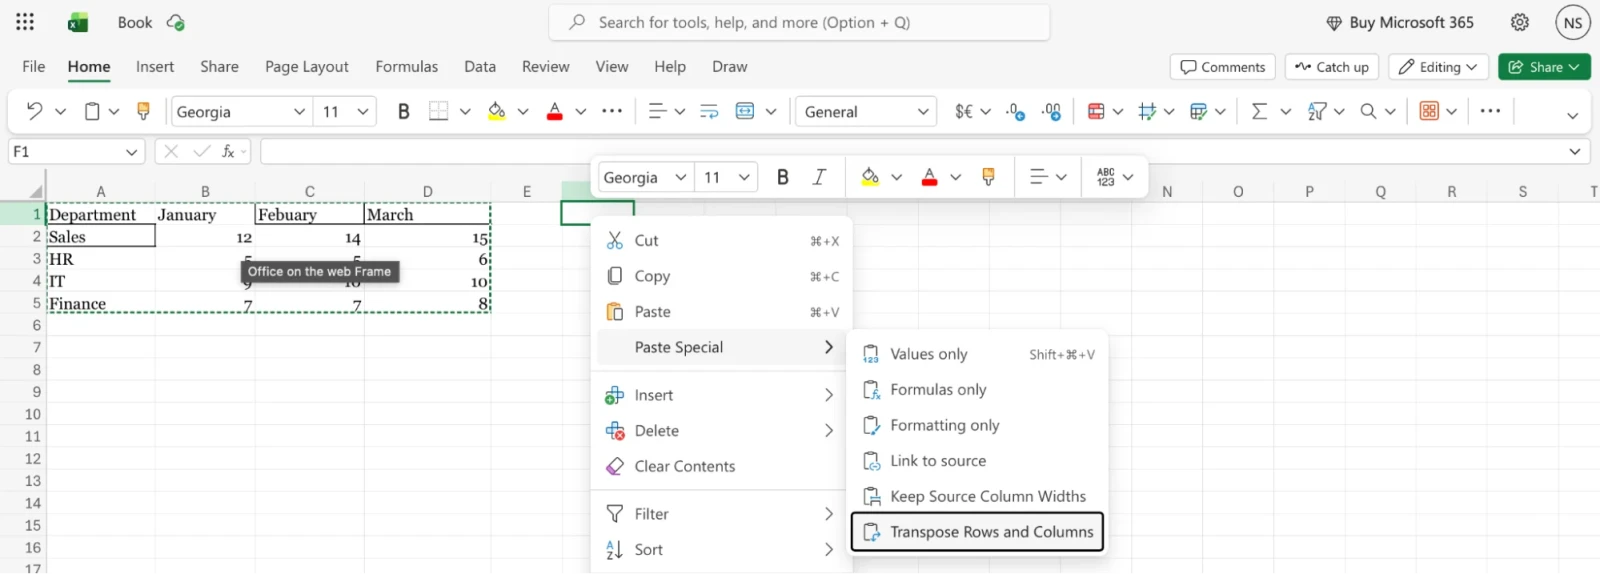
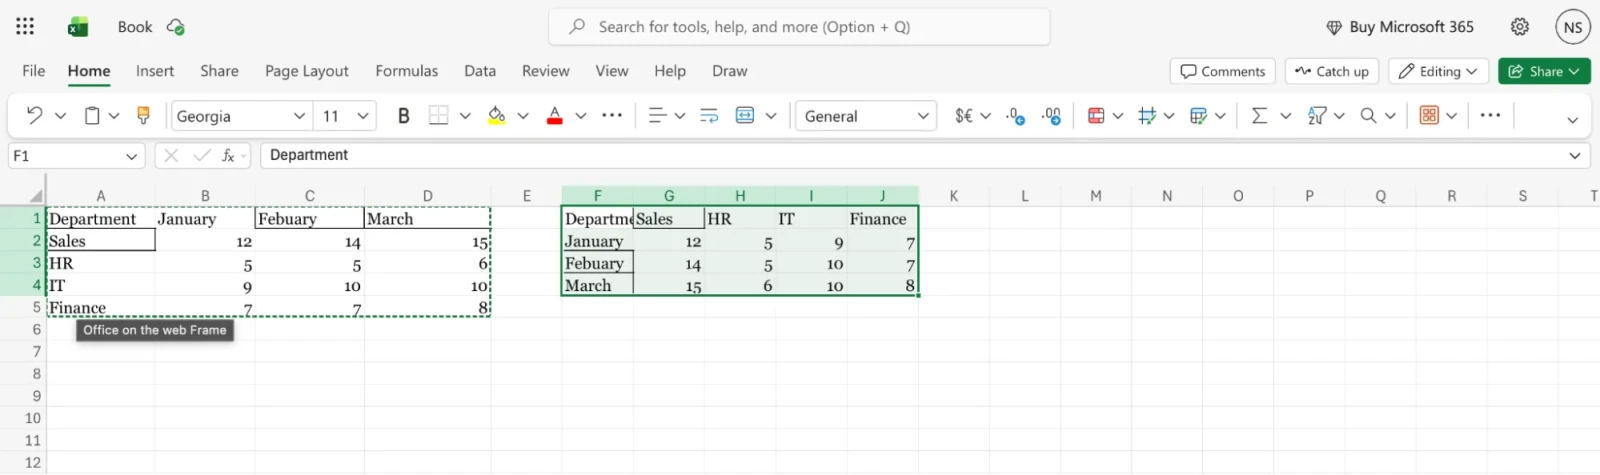
Keyboard shortcut keys: Excel places the flipped table in the new location. You can also use the keyboard. Press Ctrl + Alt + V, then press E and press Enter.
Note: Only use this method when you need a quick fix and your data will not change later.
Advantage: It is simple and it keeps your cell formatting.
Limitation: The result is static. If you edit the source, the transposed copy will not update.
The TRANSPOSE function in Excel creates a live link to your source. When a source value changes, the transposed value changes too.
The syntax is simple:
| =TRANSPOSE(array) |
The array is the range you want to flip.
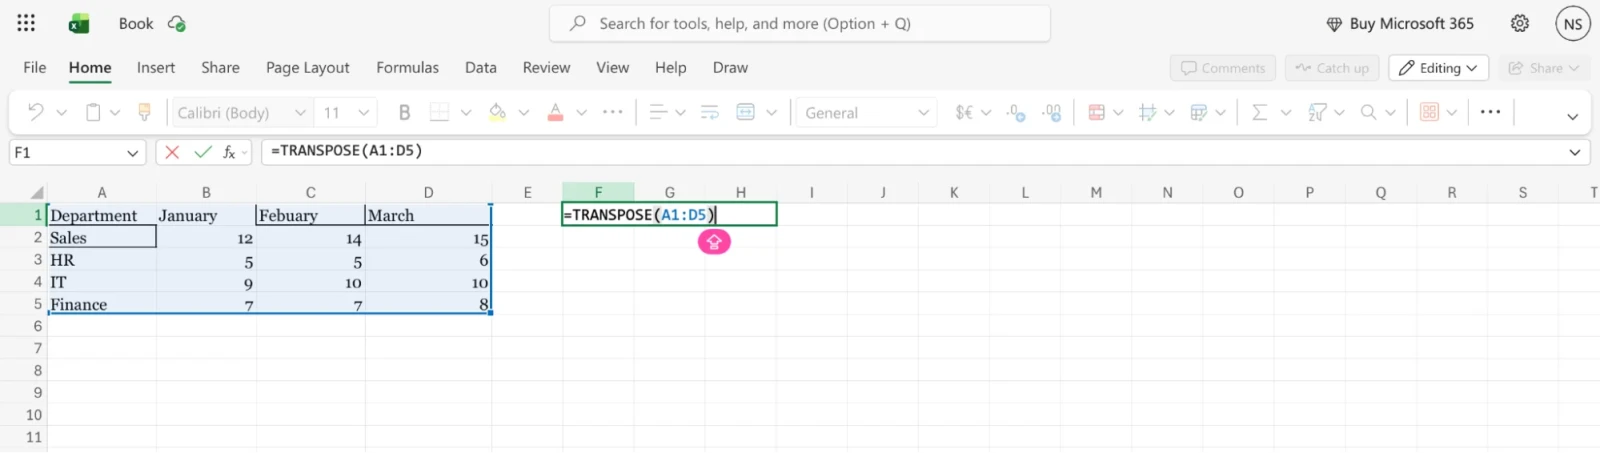
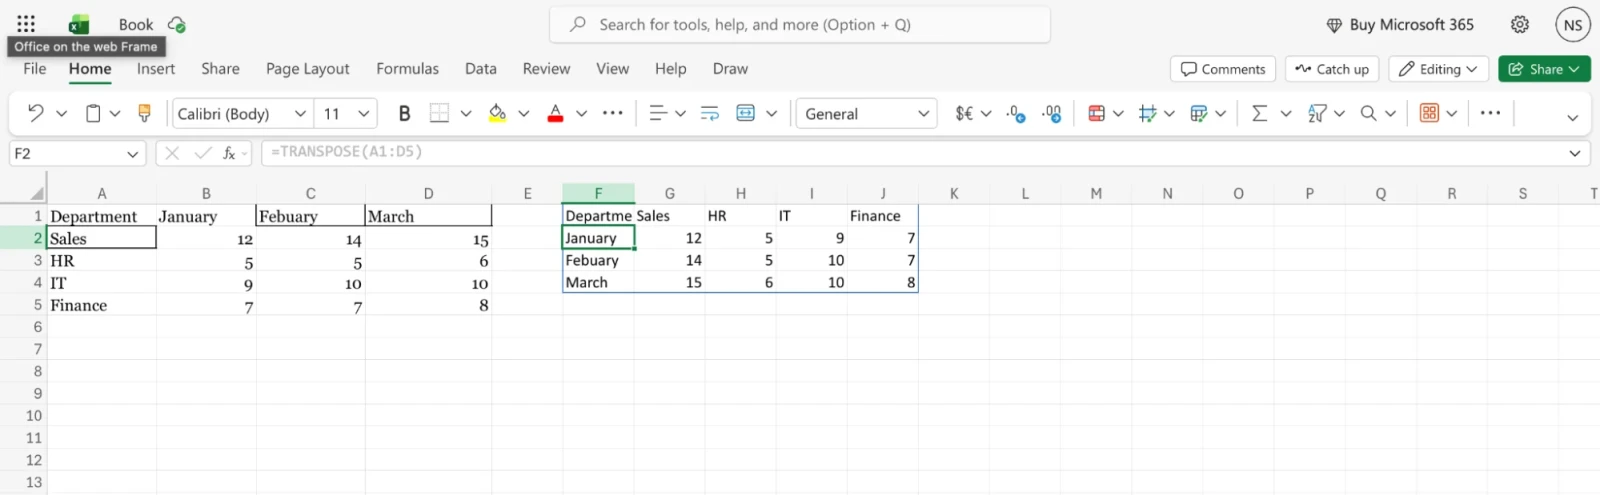
The results spill into the cells around F1 on their own.
Excel wraps the formula in curly brackets, which shows it is an array formula.
Note: Only use this method when your source data changes often and you want the new layout to stay current.
Advantage: The result updates automatically.
Limitation: You cannot edit a single cell inside the result. You must also keep enough blank space for the output.
Power Query is the best choice for large datasets and repeat work. You build the steps once and refresh them whenever the source changes.
Excel sends the flipped table to a new sheet. If the source changes later, go to the Data tab and click Refresh All.
Note: Only use this method when you have a large dataset, or you repeat the same cleanup every week or month.
Advantage: You can add more cleanup steps and you can refresh with one click.
Limitation: It takes more steps and it opens a separate editor window.
Also Explore: How to Add a Checkbox in Excel?
Now we have discussed all those three main methods for transposing your data in excel, let us briefly address some specific scenarios you might face.
Suppose you have monthly sales in B2:B7 and you want them in one row.
Now suppose your values sit in B1:G1 and you want them in one column.
The steps are almost identical in both directions. Excel treats rows and columns as a pair, so one feature handles both jobs.
A table has headers, so you need a little more care.
If your data is an official Excel Table (created with Ctrl + T), convert it to a normal range first. You can do this from Table Design by clicking Convert to Range. For very large tables, use Power Query. If you only need part of a table, select just that part before you copy it.
Learn to create, customize, and format Excel charts to visualize data and communicate insights effectively.

Over time, I have picked up a few Excel tips that I use in my daily work to save time and make handling data easier. Here are some practical tricks you can try to simplify your tasks and avoid common errors:
A #SPILL! error appears when the destination range for a spilled formula is not blank. Clear the cells in the way and the error disappears. Also keep in mind that spilled formulas do not work inside Excel tables and they cannot spill into merged cells.
Paste your transposed data in a separate area. If the two ranges overlap, Excel will block the action or give you messy results.
The TRANSPOSE function turns empty cells into zeros. Use this formula to keep them blank:
| =TRANSPOSE(IF(A1:D5="","",A1:D5)) |
In Excel 2019 and earlier, finish it with Ctrl + Shift + Enter.
Paste Special keeps most formatting. The TRANSPOSE function and Power Query move only the values. You will need to reapply colors, fonts, borders and conditional formatting yourself.
If your source cells contain formulas, review the results after you transpose. Paste as values when you want fixed numbers.
Use Paste Special for a static result. Use the TRANSPOSE function for a live link. Use Power Query for a refreshable, repeatable process.
If the new layout does not work, transpose the data again to reverse it, or press Ctrl + Z right after pasting.
Also Explore: Top 10 In-Demand Microsoft Certifications
Now you know how to transpose data in Excel and you can choose the right method for each job. Paste Special handles quick, one-time changes. The TRANSPOSE function keeps your layout linked to the source. Power Query takes care of large datasets and repeat tasks.
Try all three on a small table first. After a few minutes of practice, you will switch rows and columns in Excel without thinking about it.


