Kubernetes is amongst the most popular container orchestration tools for cloud native systems. It is being used by more than 60% of enterprises and its adoption rate has been increased to 96%. Do you want to set up this tool for your own company? If yes, then this how to install Kubernetes cluster blog post is apt for you.
"According to research from the Bureau of Labor Statistics, computer and IT jobs are expected to grow much faster than average from 2023 to 2033, with a projected 356,700 job openings annually."
It is often challenging when setting up or running your own cluster with this platform. There are many Kubernetes distributions available with their own development approach and supporting features. Choosing between them is also a point of consideration. It will not be difficult as we have included four different ways on how to install Kubernetes in this post. Let's start!
Minikube is specially designed as a tool to set up Kubernetes experience on a local machine. It runs the complete Kubernetes experience in a virtual machine (VM) or a Docker container. It is used on Hyperkit, KVM, QEMU, Parallels, Hyper-V, VirtualBox, Podman and VMWare.

The VM available on the host will be automatically selected. Docker is the most preferred choice of many experts. The following are the steps to set up Kubernetes cluster with Minikube on Linux systems with x86/64 architecture -
Explore igmGuru's top Cloud Computing Certification Courses.
1. Install Minikube by downloading the latest standards library.
$ curl -LO https://storage.googleapis.com/minikube/releases/latest/minikube-linux-amd64 |
2. Move this library to the location of your path.
$ sudo install minikube-linux-amd64 /usr/local/bin/minikube |
1. Now run minikube start command to begin the cluster
$ minikube start |
It will take a few minutes to prepare the cluster for use. This process will be shown on the terminal. It automatically changes Kubectl configuration and that's how kubectl commands communicate with the new cluster.
2. Minikube also has a bundled Kubectl system. It is used when Kubectl is not installed in the system.
$ minikube kubectl -- get nodes NAME STATUS ROLES AGE VERSION minikube Ready control-plane 10s v1.26.1 |
This tool has many optional add-ons that unlock additional functionality for clusters. Ingress (to start default Ingress controller) and Dashboard (to deploy dashboard and registry) are some of its instances. These are used to host a container image registry inside the cluster.
1. The addon list can be viewed with the minikube addons list command.
$ minikube addons list |
2. These add ons are activated through the minikube addons enable command.
$ minikube addons enable ingress |
1. It is also possible to delete and stop the cluster on this tool. It is very beneficial when individuals want to immediately end the running task and start one from the very beginning.
# Stop your cluster $ minikube stop # Stop your cluster and delete all its data $ minikube delete |
Related Article - Kubernetes for Dummies - A Comprehensive Guide to Container Orchestration
Minikube is one of the great options when using Kubernetes on a local development machine. It is lightweight, has many virtualization solutions and gives different popular add-ons like Ingress, Dashboard and more. It is not preferred in production workloads due to lack of support for node workloads on physical hosts.
MicroK8s is another lightweight Kubernetes distribution used for many applications. Canonical (a company that owns the Ubuntu operating system) manages this variant of Kubernetes. This distribution is based on unmodified upstream releases.

It is mostly used for production as it has multi node clusters that come with sane defaults. It also bundles popular add-ons to give a simple experience. This setup can be installed on different operating systems like Windows, MacOS and Linux. Let's take an example of Linux -
1. It is distributed by using the Canonical Snap packaging format in which a cluster is run by the following command -
$ sudo snap install microk8s --classic |
2. This setup then can encounter some permission errors. It can be removed by adding a user account to the microk8s.
$ sudo usermod -a -G microk8s $USER $ newgrp microk8s |
1. MicroK8s has a version of Kubectl which is accessed through microk8s kubectl.
$ microk8s kubectl get nodes NAME STATUS ROLES AGE VERSION ubuntu22 Ready <none> 103m v1.27.2 |
2. Now it is time to deploy resources inside the cluster with familiar Kubectl commands.it is achieved by running the microk8s config command that shares the cluster's connection details with a Kubeconfig file.
$ microk8s config > ~/microk8s.kubeconfig $ KUBECONFIG=~/microk8s.kubeconfig kubectl get pods |
MicroK8s has many optional add-ons as well. It unlocks many features like Ingress, RBAC, HostPath storage and Dashboard. In addition to popular community software it also has Cert-Manager, Prometheus and Minio.
1. These add ons can be viewed by running the microk8s status command.
$ microk8s status microk8s is running high-availability: no datastore master nodes: 127.0.0.1:19001 datastore standby nodes: none addons: enabled: dns # (core) CoreDNS ha-cluster # (core) Configure high availability on the current node helm # (core) Helm - the package manager for Kubernetes helm3 # (core) Helm 3 - the package manager for Kubernetes disabled: cert-manager # (core) Cloud native certificate management community # (core) The community addons repository dashboard # (core) The Kubernetes dashboard |
2. These commands are enabled by microk8s enable command.
$ microk8s enable dashboard |
It is suitable for both production and local environments. A Node is added to the by installing MicroK8s on the new Node and then running microk8s add node on the existing host. This will give an output command that is run on the new Node.
$ microk8s add-node From the node you wish to join to this cluster, run the following - microk8s join 192.168.122.210:25000/b346782cc8956830924c04f2cf1b1745/dadf654db615 Use the --worker flag to join a node as a worker not running the control plane - microk8s join 192.168.122.210:25000/b346782cc8956830924c04f2cf1b1745/dadf654db615 --worker If the node you are adding is not reachable through the default interface you can use one of the following - microk8s join 192.168.122.210:25000/b346782cc8956830924c04f2cf1b1745/dadf654db615 microk8s join 192.168.123.1:25000/b346782cc8956830924c04f2cf1b1745/dadf654db615 microk8s join 172.17.0.1:25000/b346782cc8956830924c04f2cf1b1745/dadf654db615 |
Related Article - Kubernetes Tutorial For Beginners
MicroK8s is a great choice to standardize on a Kubernetes distribution over the entire infrastructure. This includes all from developer workstations to production servers. It is used for simple multi node deployments that do not require much manual configuration. One drawback of this version is its major dependence on the Snap packaging format.
K3s is a small Kubernetes distribution that works as a single binary under 70 MB. It was created by SUSE Rancher and now is a CNCF sandbox project. It is easy to get started with this version. Anyone can download and execute the binary to launch the cluster without using any external dependencies.
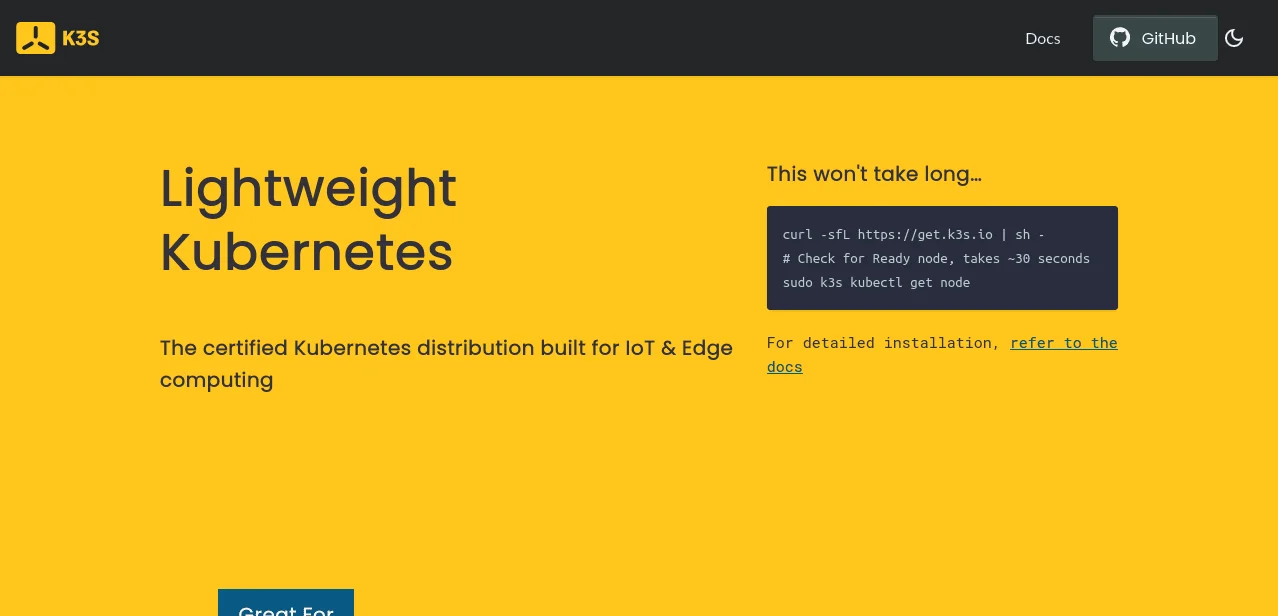
This distribution does not have many hardware requirements. It is even compatible with 1 CPU core having 512MB of RAM. It can be used on modern Linux systems with ARM, x86_64 and S390X architectures. Follow these steps to set up this version on a Linux system -
1. The quickest way to start K3s is running the official installation script. This script downloads the binary and automatically registers them with a system service. This means it starts automatically after a reboot.
$ curl -sfL https://get.k3s.io | sh - |
2. Now use the k3s kubectl command in order to interact with the cluster.
$ sudo k3s kubectl get nodes NAME STATUS ROLES AGE VERSION ubuntu22 Ready control-plane,master 5s v1.27.3+k3s1 |
Now K3s will be ready and capable of production. It will be best to use this for multi Node clusters. It is time to add some additional nodes. Just repeat the installation script on a new host.
It will need to set the K3S_URL and K3S_TOKEN variables to integrate the Node to the existing cluster. This Node is available in the file at /var/lib/rancher/k3s/server/node-token on the main Node.
$ curl -sfL https://get.k3s.io | K3S_URL=https://your-first-host:6443 K3S_TOKEN=your-token sh - |
K3s is a flexible distribution system. It has many applications across different areas. It has a small and independent binary that makes it best for development. Many individuals prefer this variant as a go to choice for independent production infrastructure. This is why it is best for IoT and new computing workloads.
Related Article - Kubernetes vs Docker: What's the Difference
Kubeadm is a unique tool and a part of the upstream Kubernetes project. It is used where provision clusters run in the ideal Kubernetes version. Creating a cluster with this tool is a comparatively more involved process than Minikube, MicroK8s and K3s.
It requires a Linux system like Ubuntu or CentOS. The hardware should have at least 2 CPUs, 2GB of RAM and sufficient disk space. The network should be proper to communication between nodes and a valid hostname configuration. One must have to install a container manually on each Node. Following are the steps -
1. Update the system and set up all the important dependencies.
$ sudo apt-get update && sudo apt-get install -y apt-transport-https curl |
2. Now install Docker with the following command -
$ sudo apt-get install -y docker.io |
3. Disable the swap to make sure that system can function properly.
$ sudo swapoff -a $ sudo sed -i '/ swap / s/^/#/' /etc/fstab |
1. Add the Kubernetes apt repository.
$ curl -s https://packages.cloud.google.com/apt/doc/apt-key.gpg | sudo apt-key add - $ echo "deb http://apt.kubernetes.io/ kubernetes-xenial main" | sudo tee -a /etc/apt/sources.list.d/kubernetes.list $ sudo apt-get update |
2. Now install the necessary packages.
$ sudo apt-get install -y kubeadm kubelet kubectl |
3. Mark these packages to hold their versions during updates.
$ sudo apt-mark hold kubeadm kubelet kubectl |
1. Use the kubeadm init command to initialize the control plane.
$ sudo kubeadm init --pod-network-cidr=192.168.0.0/16 # (Replace --pod-network-cidr with the appropriate CIDR for your network.) |
2. Configure kubectl for the current user.
$ mkdir -p $HOME/.kube $ sudo cp -i /etc/kubernetes/admin.conf $HOME/.kube/config $ sudo chown $(id -u):$(id -g) $HOME/.kube/config |
3. Verify the cluster status.
$ kubectl get nodes |
Install a network plugin to start communication between pods.
$ kubectl apply -f https://docs.projectcalico.org/manifests/calico.yaml |
1. Retrieve the join command from the kubeadm init output or run the given command on the control plane node.
$ kubeadm token create --print-join-command |
2. Run the join command on each worker node. For example:
$ sudo kubeadm join <control-plane-ip>:6443 --token |
3. Verify that the worker nodes are part of the cluster:
$ kubectl get nodes |
1. Stop the Cluster by using kubeadm reset command.
$ kubeadm reset |
2. Scale the Cluster by using kubeadm join command.
$ kubeadm reset |
Read Also: What is Kubernetes Architecture
Kubeadm is one of the best solutions for upstream Kubernetes systems. It is more comfortable with manual system administration. This tool gives features to manipulate additional components like underlying container runtime. It has many limits in terms of scope and design. This is why it is best to use as a base for large tools like Minikube and MicroK8s.
There are many tools available for interacting with the cluster in Kubernetes. You can use any of them after successfully installing one of the above set up. Kubectl CLI and Kubernetes Dashboard are the most popular choice among many experts. Each of them have their own unique functions and features. This means the choice of best will be determined according to user preference.
We have explored four of the most popular methods on how to install Kubernetes in this blog post. Each of them have their own pros and cons, and are best in different applications. The first three methods are the most popular for local use as they are easy distributions. Kubeadm is a little complicated to install and maintain. Excerpts use it for unique cases only.
There are many ways to install this platform based on different operating systems. It has different versions designed to cater specific requirements. One can choose any set up according to their operations and use cases.
It is indeed free as a platform. You can easily download and use it by following a proper method. It only demands a subscription for cloud uses. This means anyone can use it for free until they use cloud services.
Learning this platform is not so hard. Anyone can master it by completing prerequisites and following a structured learning path. They can also use online resources like tutorials and courses where they will get learning from the top industry experts.
Course Schedule
| Course Name | Batch Type | Details |
| Kubernetes Training | Every Weekday | View Details |
| Kubernetes Training | Every Weekend | View Details |