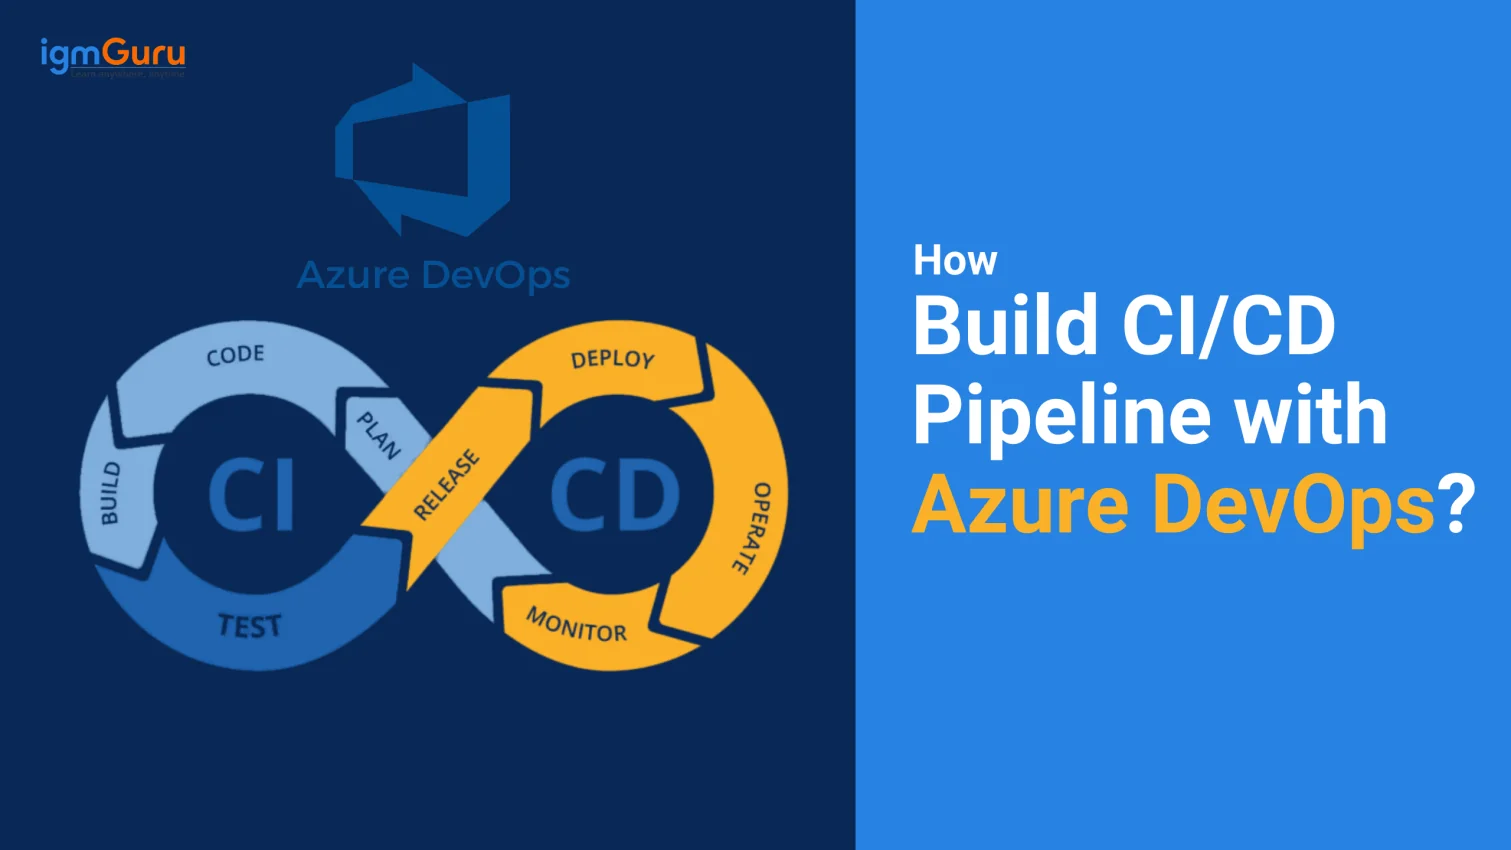
Azure CI/CD pipelines is a great solution for automating the build, test, and deployment workflows in the cloud. It comes with extensive capabilities to smooth software delivery across different platforms and development environments. If you want to leverage its abilities, read on to learn how to build CI/CD pipelines with Azure DevOps from scratch with this step-by-step guide.
To build a CI/CD pipeline with Azure DevOps basically involves setting up an Azure DevOps Project, preparing a code repository, making the build pipeline, the release pipeline and more. In this article, we will understand all about building the Azure CI/CD pipeline. It also includes everything one should know before learning to create them. You will explore the stages, advantages, steps to create, best practices and more. Let's begin.
Azure CI/CD pipeline is the key utility that manages each function of the software development lifecycle (SDLC). It gives a quick approach to perform all processes of SDLC from designing and creating to testing and deploying.
Continuous integration is an app development practice in which code modifications are frequently integrated into the related directory. It is an automatic process that can detect potential issues even before they take place. This reduces the risk of integration problems.
Continuous Delivery takes this process one step further. It automates the delivery of every modification directly to production. This automation goes up to a staging environment that requires manual approval. Both of these practices together aim to accelerate the app deployment.
Explore igmGuru's Azure DevOps Training program to build a career in cloud technology.
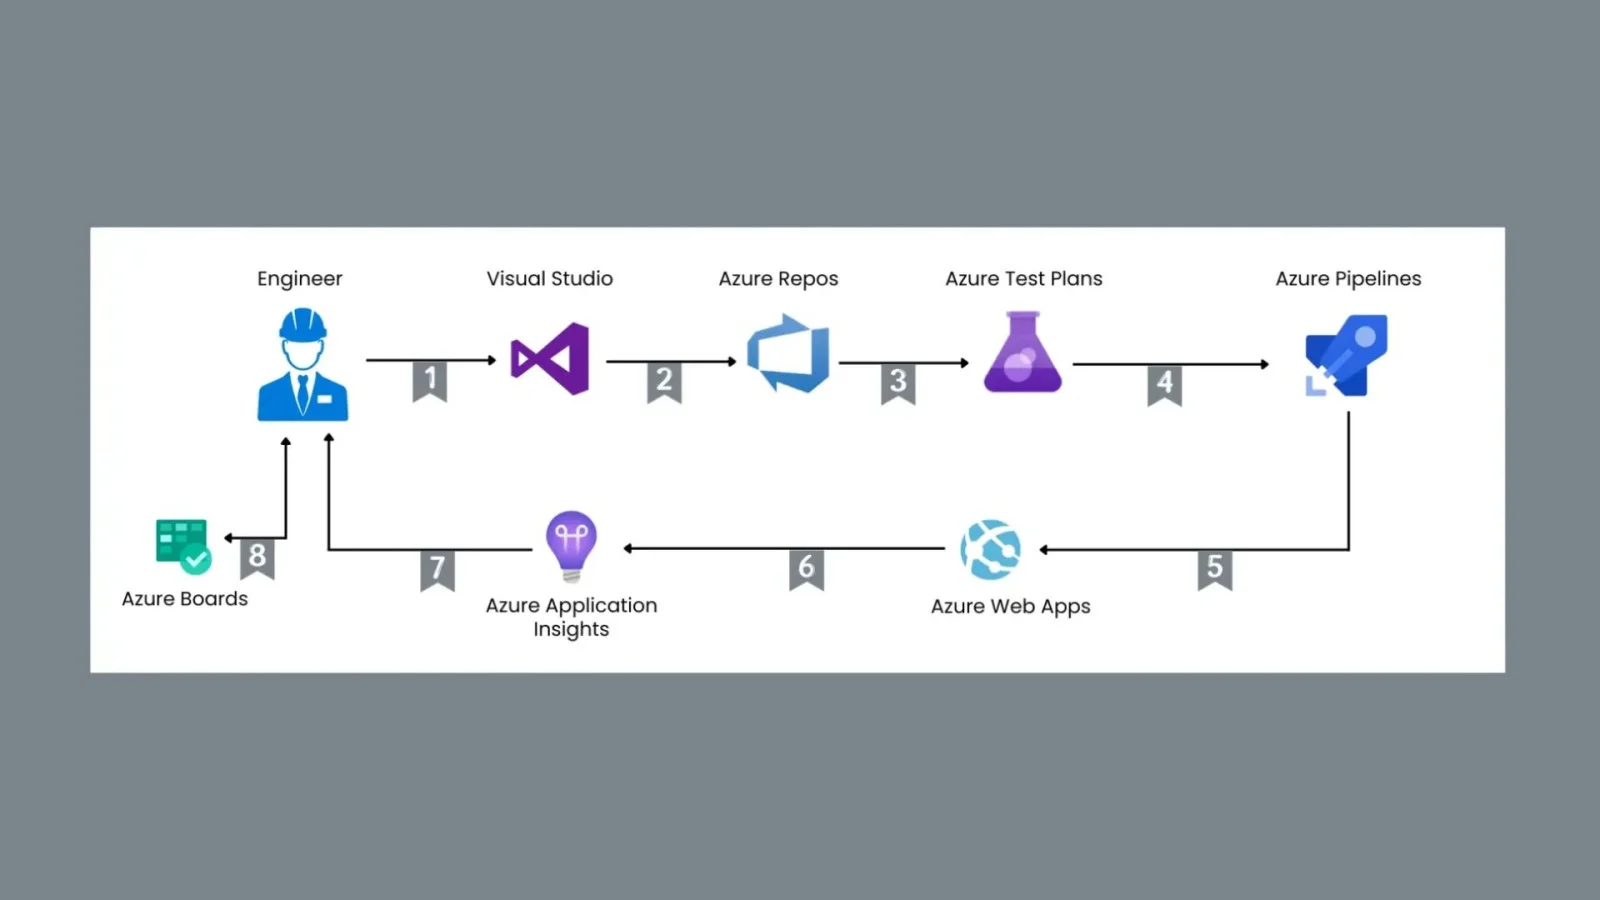
Azure CI/CD pipeline works in different stages. Understanding these stages gives a complete knowledge of how CI/CD pipelines work.
There are many advantages of using an Azure CI/CD pipeline in DevOps. One must know these to make better use of this methodology. Here are some of the main advantages -
There are many options for programming languages that any company can use. This initializes the requirements of a suitable development environment where they can use any of them. Azure DevOps has the capability to develop and deploy applications using different programming languages. It can use Java, JavaScript, Ruby, Python, C, C#, Go, .NET, PHP, PowerShell and many more.
Testing and deployment are the most complicated as well as important phases of SDLC. DevOps engineers can divide these phases into different stages to control the app's quality. This approach benefits in many ways, including bug detection, code optimization, performance testing, etc. All these benefits ultimately lead to an error-free deployment.
The features are not the only benefit of this methodology. Microsoft constantly keeps upgrading this technology with new functions. Thus, it always remains relevant to the needs of the advanced world. This is also one of the main reasons behind the great demand for this methodology.
Pricing is another impressive thing about Azure DevOps. Companies of different sizes can easily afford their services at a reasonable cost. It has two types of pricing modules. Creating the public project using the CI/CD pipeline is completely free. Companies may have to subscribe to a plan for creating private projects.
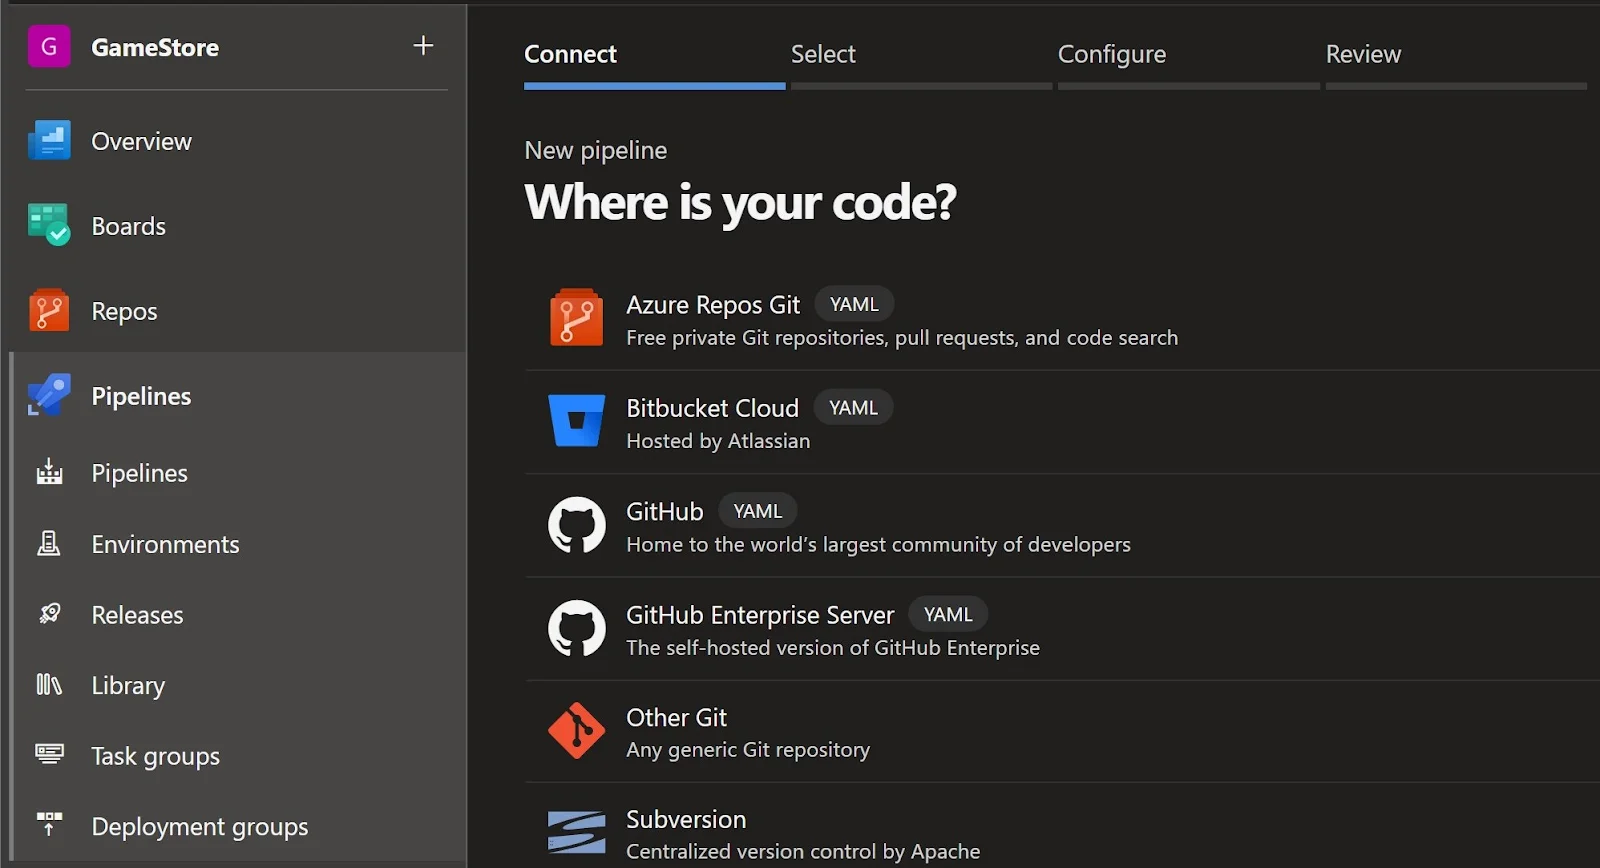
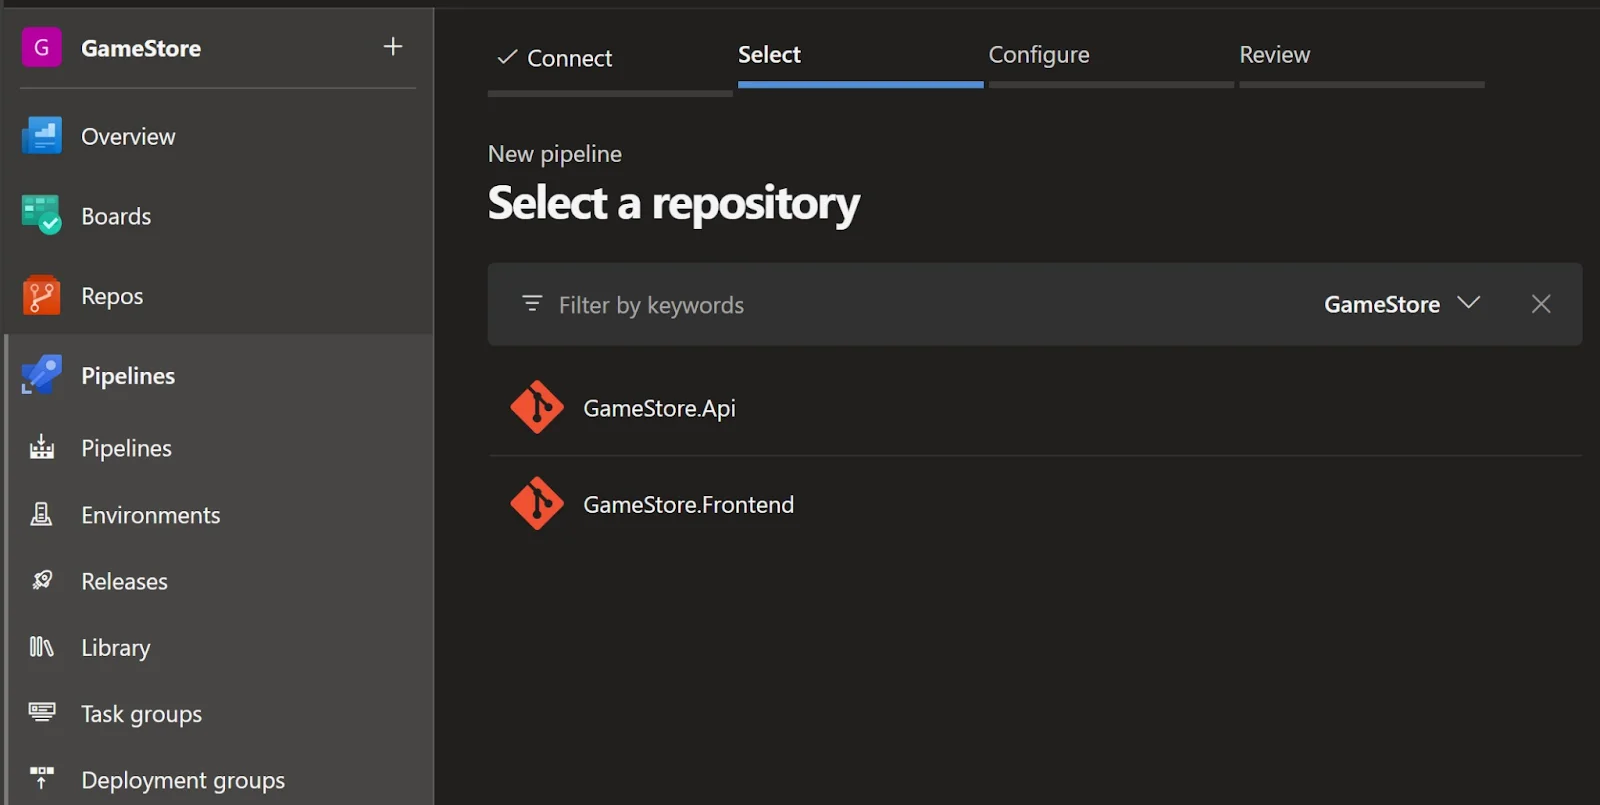
The following are the steps to build an Azure CI/CD pipeline -
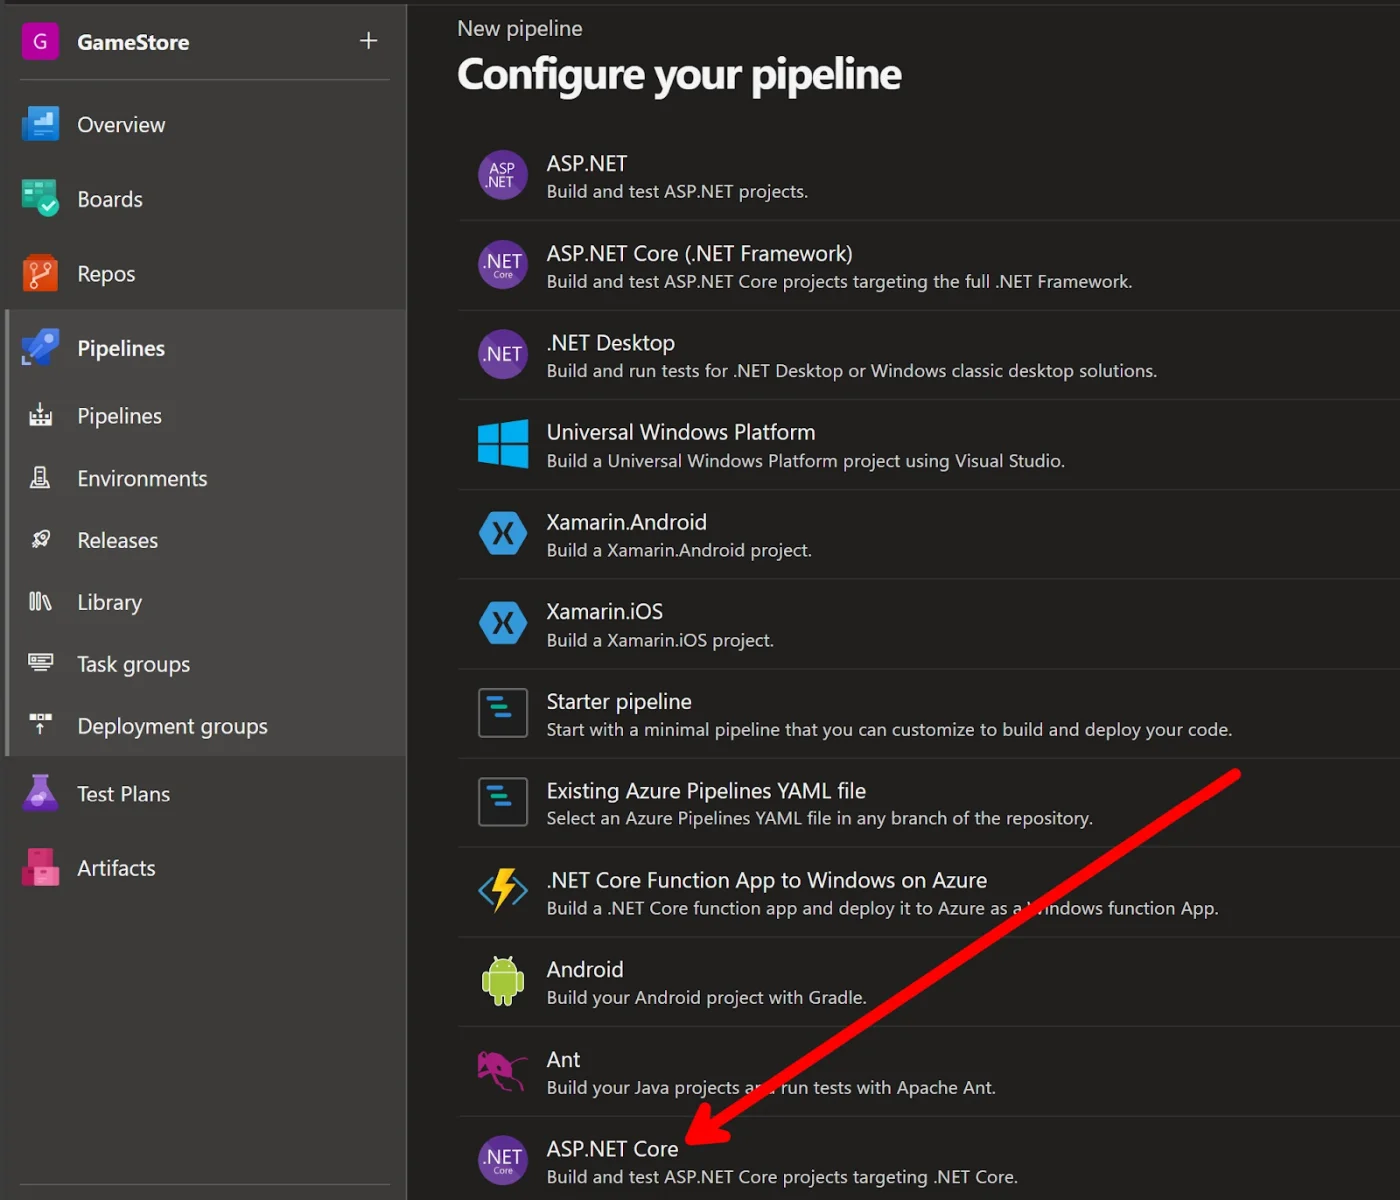
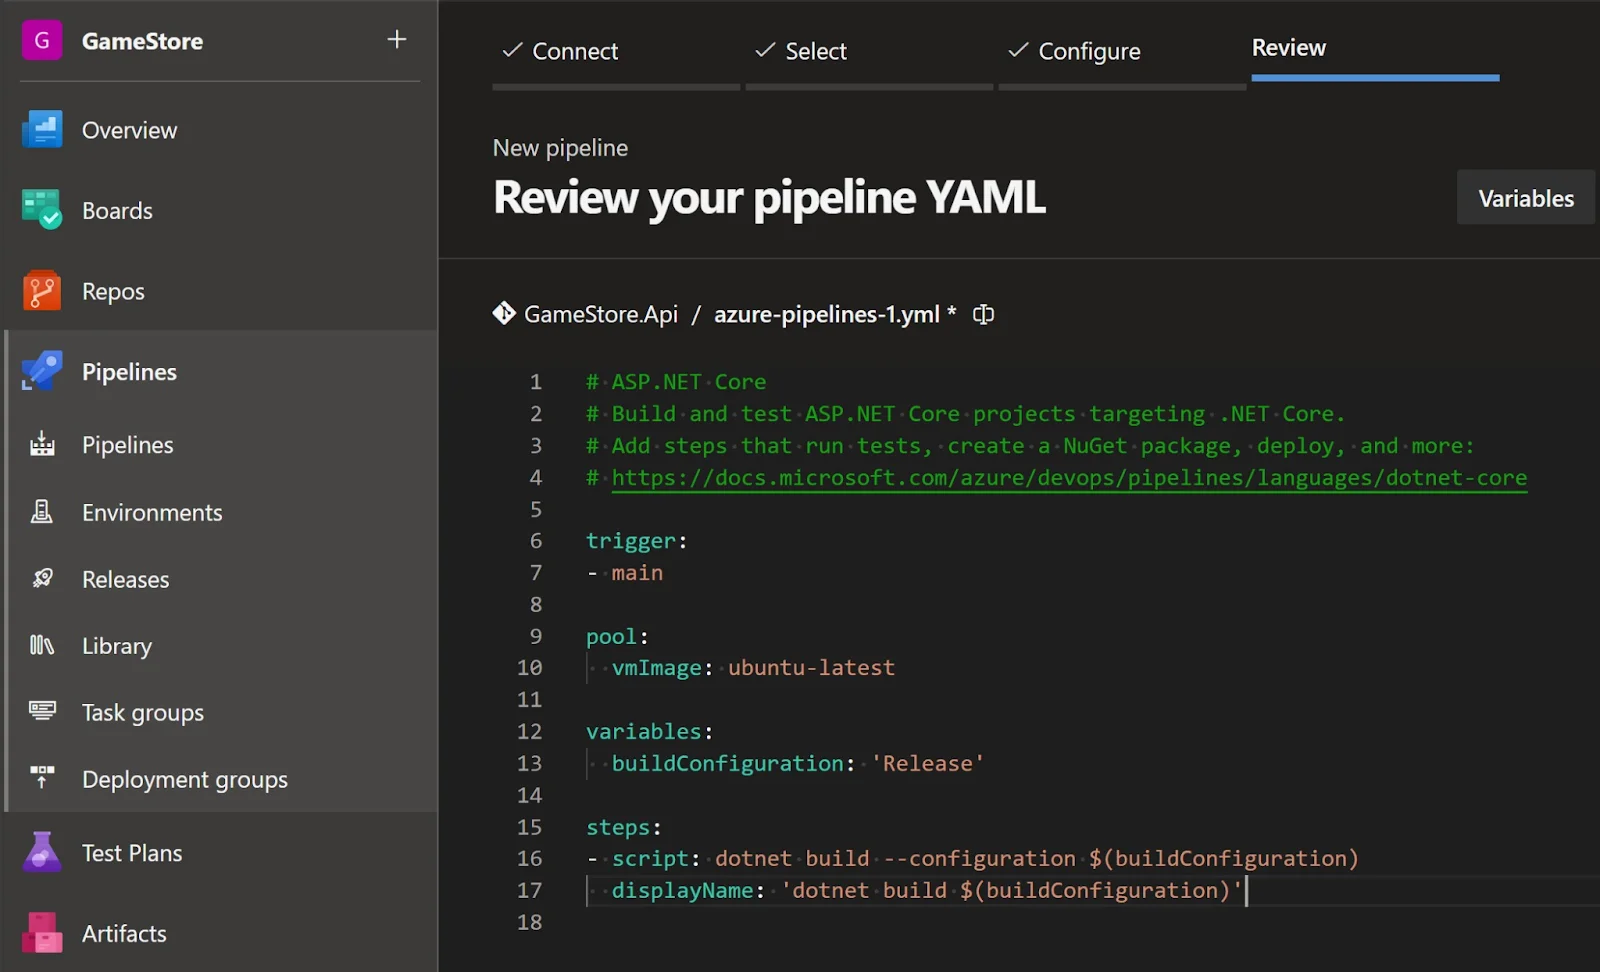
Individuals can use the default script according to their application. It is preferred to use the .NET Core task to be explicit about the .NET SDK version. This uses and avoids typos from the actual .NET command of execution.
steps: 1. task: UseDotNet@2 displayName: Use .NET 8 SDK inputs: packageType: 'sdk' version: '8.x' 2. task: DotNetCoreCLI@2 displayName: Build inputs: command: 'build' projects: 'GameStore.sln' arguments: '--configuration $(buildConfiguration)' |
3. task: DotNetCoreCLI@2 displayName: Test inputs: command: 'test' projects: 'GameStore.Api.IntegrationTests/GameStore.Api.IntegrationTests.csproj' arguments: '--configuration $(buildConfiguration)' nobuild: true |
Use the Azure CLI task to publish Docker images and authenticate actual registry. Performing this for the first time requires permission from admins. This will automatically build a service integration with the project and the Microsoft Entra ID tenant.
variables: buildConfiguration: 'Release' appName: 'gamestore03' ... 1. task: AzureCLI@2 displayName: ACR Login inputs: azureSubscription: 'My Subscription' scriptType: 'pscore' scriptLocation: 'inlineScript' inlineScript: 'az acr login --name $(appName)' |
This function uses the appName variable to simplify pipeline values. You can also use it to create and push Docker images to a registry. It uses .NET apps as given below -
2. task: DotNetCoreCLI@2 displayName: Publish Docker image inputs: command: 'publish' projects: 'GameStore.Api/GameStore.Api.csproj' arguments: '-p ContainerRegistry=$(appName).azurecr.io -p ContainerImageTag=$(Build.BuildId) /t:PublishContainer' publishWebProjects: false zipAfterPublish: false nobuild: true |
Now deploy this image to the Azure Container App.
3. task: AzureContainerApps@1 displayName: Deploy inputs: azureSubscription: 'My Subscription' imageToDeploy: '$(appName).azurecr.io/gamestore-api:$(Build.BuildId)' containerAppName: '$(appName)' resourceGroup: '$(appName)' |
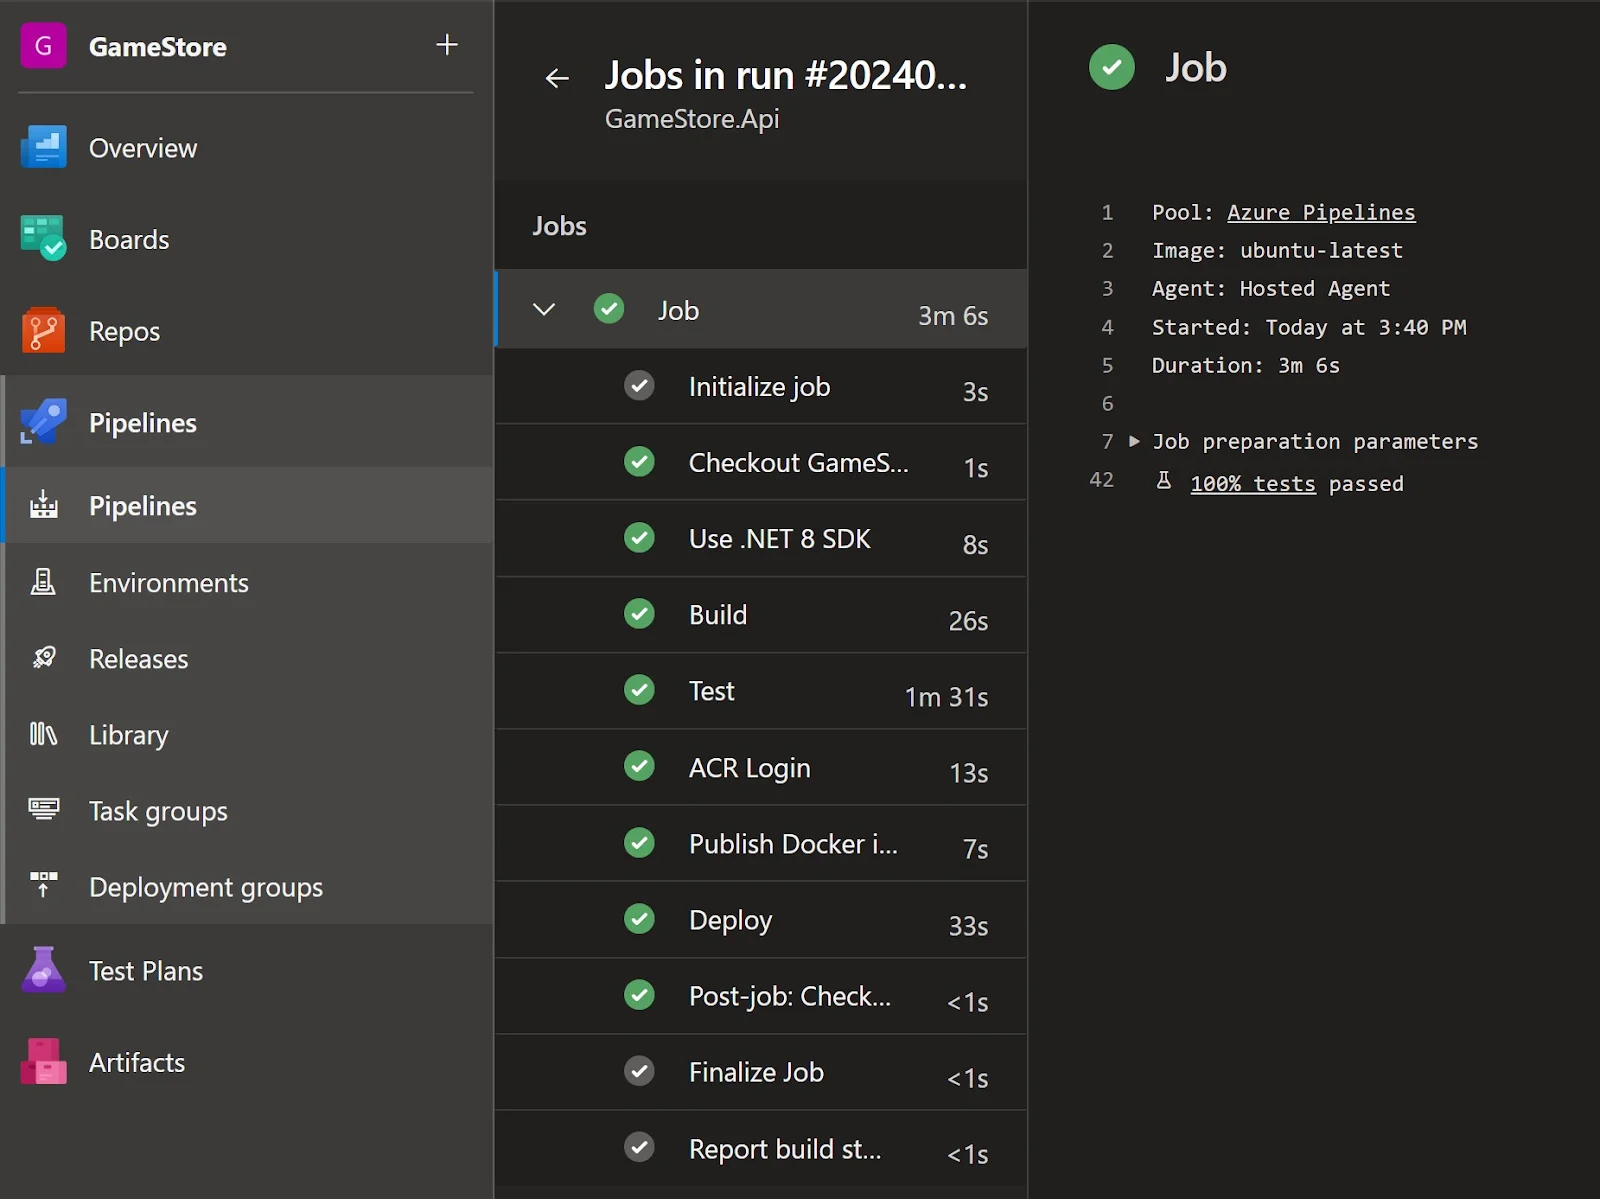
Go to the section of the pipeline after saving the pipelines. You will see the options given below. This means you have successfully created an Azure CI/CD pipeline environment.
Related Article- Microsoft Azure Tutorial for Beginners
It might be complicated to create an Azure CI/CD pipeline for beginners. This is why they should know about the best practices. They can achieve the requirements of their project by using these practices.
Code testing can be a time-consuming task for the developers. This is why they should use the automated testing feature. This not only saves their time to focus on logic but also reduces the chances of errors. It can automate almost every test including, unit, regression and or functional. It also streamlines the process of prompt identification and bug resolution.
Use different test environments for development, staging, testing and production. This separation gives proper isolation and mitigates the issues before code deployment. Most developers often use a distinct development environment to build and test code locally. The staging environment can validate the behavior of the application. The production environment releases applications with many resource allocations that provide optimal performance and uptime.
Developers using CI/CD tools can achieve business requirements to make maximum profits. GitLab, TeamCity, Jenkins or Bamboo are some of the versatile solutions. Jenkins is best for its customizability, which gives adaptability to specific organizational requirements.
Optimize the DevOps pipeline to achieve maximum value in the minimum time possible. It is achieved by minimizing delays and streamlining processes. This practice is very useful when working on a task with a small timeline.
Improving team collaboration promotes transparency and prevents conflict. It is also important to collaborate with all the stakeholders on the same page. This contributes to smoother workflows.
Azure CI/CD pipelines help development teams automate software delivery efficiently. By integrating code, running tests and deploying to production, they can boost productivity, reduce errors and shorten release cycles. This tutorial walks you through building a CI/CD pipeline using Azure DevOps, covering everything from setup to best practices.
Azure DevOps is a cloud service that performs continuous integration and continuous deployment. CI/CD is a key part of SDLC that automates the process of developing, testing and deploying applications.
The main aim of using these pipelines is to develop, test and deploy applications in a cloud environment. It performs these processes into different stages, where it is also possible to automate them.
The choice of the best tool depends on the requirements of the project. Bitbucket, Jenkins, CircleCI, Harness, BrowserStack and Semaphore CI are some of the best options.
About Author
Course Schedule
| Course Name | Batch Type | Details |
| CI/CD Training | Every Weekday | View Details |
| CI/CD Course | Every Weekend | View Details |