react native tutorial

React Native Tutorial For Beginners

April 1st, 2026
20453
7:00 Minutes

Anyone who wishes to advance their career as a developer must know that having React and React Native in their tool belt will be highly beneficial. It is a powerful framework from Meta that is capable of developing native-performing apps for both iOS and Android. Since using cross-platform frameworks for creating mobile apps is more of a trend, it is best to get equipped with the right tools to make it happen.

This React Native tutorial is perfect for web developers transitioning to mobile or anyone eager to learn mobile app creation. It will help you to find yourself with the prowess to develop native mobile apps that work well on both iOS and Android devices. Start your journey today and build the next great app!.

Read Also - Azure Databricks Tutorial For Beginners

What is React Native?

React Native is a JavaScript (JS) framework that is used for building natively-rendering, cross-platform applications. It was developed in 2015 and has gained massive popularity in the last decade. This popularity comes from its extensive features and capability. It is easy to learn and allows developers to create applications for different operating systems with one code base.

It is generally used for rendering UI across various platforms including macOS, Windows, iOS and Android. This framework also provides a basic structure of apps that can be further customized according to requirements. This means developers do not have to always start from scratch. Now it is powering many popular applications like Meta, Instagram and Skype.

Key Concepts in React Native Development

Let's start by understanding some of its basic concepts. It will help you to be familiar with different technical terminologies used in this framework.

    • Components

    Components are the fundamental building and reusable building blocks that form the user interface (UI) of the mobile app. These enable developers to create interactive and dynamic elements. These are View, Text, Image, Button, ScrollView, FlatList and more. It is also possible to create customized components by adding custom logic and styling.

      • Props

      Creating a new component requires adding some new parameters to it. These parameters are known as properties or props. These are immutable and can not be changed in any condition. One basic example of these pros are source properties of an image component. For instance:

      import React, { Component } from 'react';

      import {

      Platform,StyleSheet,Image,Text,View}from 'react-native';

      export default class App extends Component<{}> {render()

      {let imagePath = { uri:'https://facebook.github.io/react-native/img/header_logo.png'};

      return (<View style={styles.container}> <Text style={styles.welcome}>Welcome to React Native!</Text> <Image source={imagePath} style={{width: 250, height: 250}} /> </View>); } }

      const styles = StyleSheet.create({container: { flex: 1, justifyContent: 'center', alignItems: 'center', backgroundColor: '#a7a6a9', },

      welcome: { fontSize: 30, textAlign: 'center', margin: 20, } });

      react native development

        • State

        The state is another important concept used when creating components. Unlike props, the state is mutable and can be changed based on the requirements. It is usually initialized in the constructor (for class components) or by using the useState hook (in functional components). State changes are made using the setState method in class components or the state updater function in functional components.

        • JSX (JavaScript XML)

          JSX is basically a syntax extension for JavaScript that helps to define the view of the user interface. It looks like any other template language, but comes with the capabilities of JavaScript. It is not necessary to use JSX in a React code, as there are many other options available. But it is a favorite choice of most developers due to its visual aid in UI.

          • Flexbox Layout

            Flexbox allows developers to create complicated layouts with ease. It provides an efficient method of distributing space and aligning items within a container. This facilitates situations where the item’s size is dynamic. Flexbox is specially designed to build a consistent layout of any screen size or orientation. One can use the following commands to create a new project:

            npx create-expo-app flexbox cd flexbox npm start

            Read Also: How to Learn React Native

            Setting Up React Native Environment

            Setting up the React Native environment is essential for the learners. As we know, this framework is used on multiple operating systems. We are taking Windows as the development OS and Android as the target OS.

            Prerequisites

            • You will need a command line interface, Java Development Kit (JDK) and Android Studio.
            • Install the GIT first.
            • There is no necessity of choosing a particular editor for development.
            • It is recommended to install the LTS (Long-Term Support) version of Node from Chocolatey (A package manager for Windows).
            • In case, you want to switch between different versions, use nvm-windows (A Node version manager for Windows).

            Step 1: Install Node.js (LTS) and Required Tools

            React Native uses Node.js to run JavaScript code and npm (Node Package Manager) or Yarn to manage dependencies.

            • Go to the official Node.js website and download the LTS version installer. It is best for stability.
            • Run the installer, accept the license agreement and use default settings until you reach the Tools for Native Modules screen.
            • Check the box labeled Automatically install the necessary tools on this screen. This will install Chocolatey, Python and the Visual Studio Build Tools. Then, click on the Next button.
            • Click on the Install and then Finish button when done.
            • This might automatically open a PowerShell window to install the additional tools. Approve any prompts and let this process complete.
            • Open a new Windows Terminal window and use the following commands to verify installation.

              1. node --version
              2. npm --version
              3. choco --version

              Step 2: Install Java Development Kit (JDK)

              React Native requires a specific version of the JDK for Android development. As of now, JDK 17 is the most recommended one.

              • Open Windows Terminal as Administrator and use the following command: choco install -y microsoft-openjdk17
              • Open a new regular Windows Terminal window and use the following command to ensure the installation. java --version

              Step 3: Install Android Studio

              Android Studio provides the Android SDK, build tools and an emulator.

              • Go to the official Android Developers website and download Android Studio.
              • Run the installer.
              • You have to ensure that all required components are selected, especially the following ones:
              1. Android Studio
              2. Android SDK
              3. Android SDK Platform
              4. Android Virtual Device
              • You can also change the default settings through the installation process according to the requirements.
              • After installing it, run the Android Studio and choose the ‘do not import settings’ option as a beginner.

              Step 4: Configure Android Studio & Install SDKs/Tools

              Android Studio needs some specific SDK components. You can configure it from the Android Studio Welcome screen.

              For SDK Platform Tab:

              • Click on More Actions > SDK Manager.
              • Check the box Show Package Details in the bottom right corner.
              • Find and expand the entry for the required API level. You also have to ensure that the following are checked and installed for that API level.
              1. Android SDK Platform 34
              2. Google APIs Intel x86_64 Atom System Image.

              For SDK Tools Tab:

                1. Ensure Show Package Details are checked.
                2. Make sure the following are checked and up-to-date:
                • Android SDK Build-Tools.
                • Android SDK Command-line Tools.
                • Android Emulator.
                • Android SDK Platform-Tools.
                • Intel x86 Emulator Accelerator.

                Lastly, click on the Apply button. Review the list of packages to be installed/updated and click OK. Accept any license agreements and wait for the downloads and installations to complete.

                Step 5: Configure Environment Variables

                It is important to define the location of the Android SDK.

                • Go to the Android Studio SDK Manager and you will see the location at the top. Copy this path.
                • Open Windows Search, type environment variables and select Edit the system environment variables.
                • Click the Environment Variables button from the System Properties window.
                • Under User variables, click on New, give variable name, paste the location path and click on the OK button.
                • Close all Windows Terminal instances, open a new one and type adb devices to check the configuration. If the platform-tools path is set correctly, you should see an output like a List of devices attached. In case you get a command not found error, recheck your Path variable.

                Related Article- React Native Interview Questions

                  Creating Your First React Native App

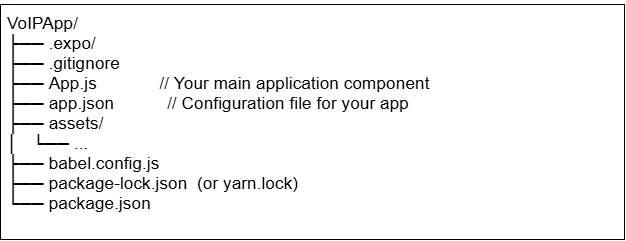
                  Let's create our first project using this framework. We are creating a basic VoIP calling app that can support calling between iOS and Android. This section will cover all the essential steps, so you don’t need to have any prior experience.

                        • Create a New Project

                        1. Open your terminal or command prompt.
                        2. Go to the directory where you want to build the project.
                        3. Run the following command using the Expo CLI: expo init VoIPApp
                        4. The Expo will redirect you to select a template. For a basic project, you can select the blank template or blank (TypeScript) if you prefer using TypeScript.
                        5. Go to the project directory, once it is created. cd VoIPApp

                        • Set Project Structure

                        A basic Expo project structure will look something like this


                        • Writing Your Basic UI (Conceptual):

                        Open the App.js file in your code editor. This is where you will start building your user interface. For a basic VoIP app, consider the following UI elements:

                        1. Input Field: To enter the phone number or user ID to call.
                        2. Call Button: To initiate the call.
                        3. Potentially a Display: To show the status of the call.

                        Here is a very basic example of how your App.js might look initially:

                        import React, { useState } from 'react';

                        import { StyleSheet, Text, View, TextInput, Button } from 'react-native';
                        export default function App() { const [callTo, setCallTo] = useState('');

                        const [callStatus, setCallStatus] = useState('');
                        const handleCall = () => { setCallStatus('Calling...');// In a real app, you would initiate the VoIP call logic here

                        console.log(`Calling: ${callTo}`); // After some time or a real call attempt, you'd update

                        callStatus setTimeout(() => { setCallStatus('Call Ended'); }, 3000); };

                        return ( <View style={styles.container}> <Text style={styles.title}>Basic VoIP App</Text> <TextInput style={styles.input}

                        placeholder="Enter number/ID to call" value={callTo} onChangeText={text => setCallTo(text)} /> <Button title="Call" onPress={handleCall} /> <Text style={styles.status}>{callStatus}</Text> </View> ); }
                        const styles = StyleSheet.create({ container: { flex: 1, backgroundColor: '#fff', alignItems: 'center', justifyContent: 'center', padding: 20, }, title: { fontSize: 24,fontWeight: 'bold', marginBottom: 20, },

                        input: { width: '80%', borderColor: 'gray', borderWidth: 1, padding: 10, marginBottom: 15, borderRadius: 5, },

                        status: { marginTop: 20, fontSize: 16, fontWeight: 'bold', },

                        });

                          • Running Your App:

                          1. Using Expo CLI:npx expo start, This will open the Expo Go app on your connected physical device (iOS or Android) or an emulator/simulator. You will need to have the Expo Go app installed on your device.
                          2. Using React Native CLI

                          For iOS:

                          npx react-native run-ios

                          For Android:

                          npx react-native run-android

                          This will build and run your app on the iOS simulator and Android emulator or a connected physical device.

                          Read Also - ChatGPT Tutorial For Beginners

                          Conclusion

                          This is the right time to learn React Native with industry experts because the coming years are going to bring in more career opportunities in the IT industry. Anyone who has a background in web development and wishes to expand their horizons must go for this framework. With this React Native tutorial, you can easily learn and create your first mobile app without any hassle.

                          "According to research from the Bureau of Labor Statistics, computer and IT jobs are expected to grow much faster than average from 2023 to 2033, with a projected 356,700 job openings annually."

                          FAQs

                          Q1. How long can it take to learn React Native?

                          Depending upon your current knowledge and skills, it can take anywhere between 2-6 months to learn this JS framework.

                          Q2. Do I need to learn JavaScript for React Native?

                          Having knowledge of JavaScript's data types, object-oriented programming, functions, and syntax before getting into React Native development is important.

                          Q3. Is React Native a good career?

                          Yes, React Native is certainly a good career as it opens numerous growth opportunities in the field of mobile development and cross-platform app development.

                          Q4. What is React Native mainly used for?

                          React Native is mainly used to build cross-platform mobile apps for Android and iOS using a single codebase.

                          Q5. Does React Native require coding?

                          Yes, React Native requires JavaScript coding to build mobile applications.

                          Explore Our Trending Articles -

                          Course Schedule:

                          Course NameBatch TypeDetails
                          React Native Training
                          Every WeekdayView Details
                          React Native Training
                          Every WeekendView Details
                          About the Author
                          Author Nehal Sharma
                          About the Author

                          Nehal Sharma is a skilled Data Analyst with expertise in Java, mobile development, and data analytics. She transforms complex data into actionable insights and has experience in business intelligence, data science, and Salesforce. She also simplifies technical concepts into clear, engaging content for learners and professionals.

                          Drop Us a Query
                          Fields marked * are mandatory
                          ×

                          Your Shopping Cart


                          Your shopping cart is empty.