One of the most common data cleanup tasks in Excel is splitting a full name into separate columns: first name, last name, and sometimes a middle name or suffix. Whether you have imported a contact list, downloaded a CRM export, or received data from another team, names that are stuck together in a single cell slow down sorting, filtering, mail merges, and analysis.
The good news: Excel gives you multiple ways to separate names, from completely no-formula tools like Flash Fill and Text to Columns to powerful formula-based approaches that update dynamically when your source data changes. This guide covers every method clearly, with real examples, so you can pick the one that fits your data and skill level.
Read Also: Excel Multiply Formulas
The method you use depends heavily on how names are structured in your data. Before applying any formula or feature, check which format you are working with:
| Format | Example | Separator |
|---|---|---|
| First Last | John Smith | Space |
| Last, First | Smith, John | Comma + Space |
| First Middle Last | Arjun Kumar Singh | Two Spaces |
| First Last Suffix | Rajiv Sharma Jr. | Space |
| Last First (no comma) | Smith John | Space |
Identifying your format first saves a lot of troubleshooting later. Most methods below include notes on which formats they handle best.
Text to Columns is Excel's built-in wizard for splitting cell content into multiple columns based on a delimiter, a character that separates the parts, like a space or a comma. It requires no formulas and works in seconds for clean and consistent data. The steps for this process is as follows:
1. Insert two or more blank columns to the right of your name column; this is where the split data will land.
2. Select the entire column containing the full names (e.g., column A).
3. Go to the Data tab → click Text to Columns (in the Data Tools group).
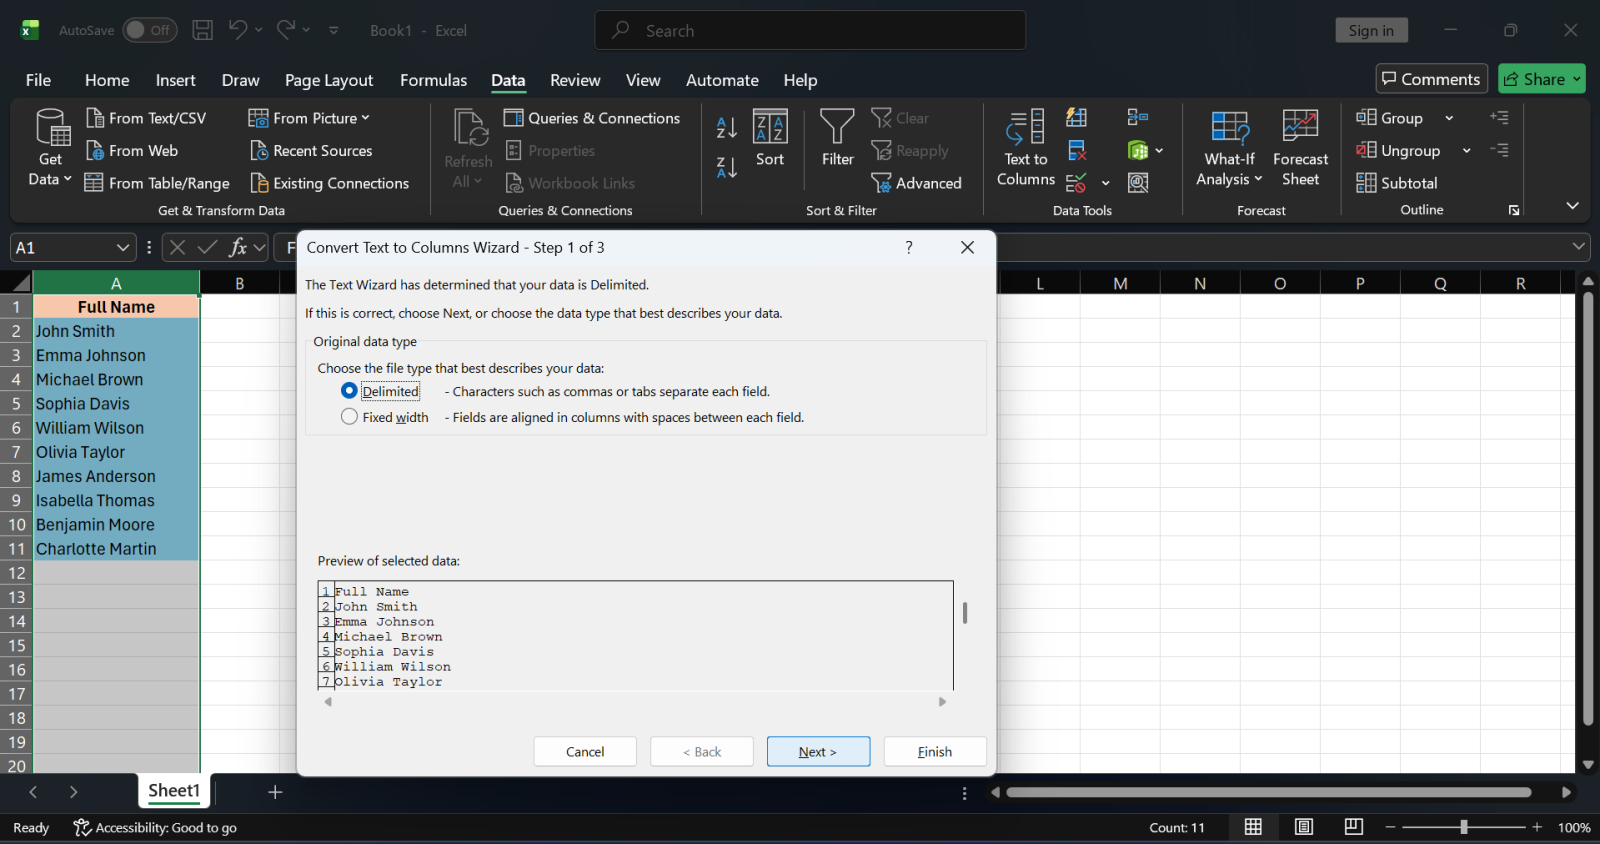
4. In the wizard, Step 1: select Delimited → click Next.
Also Read: Power Automate Tutorial For Beginners
5. Under Delimiters, check Space (for "First Last" format) or check Comma and Space together (for "Last, First" format). Watch the Data Preview at the bottom to confirm it looks correct → click Next.
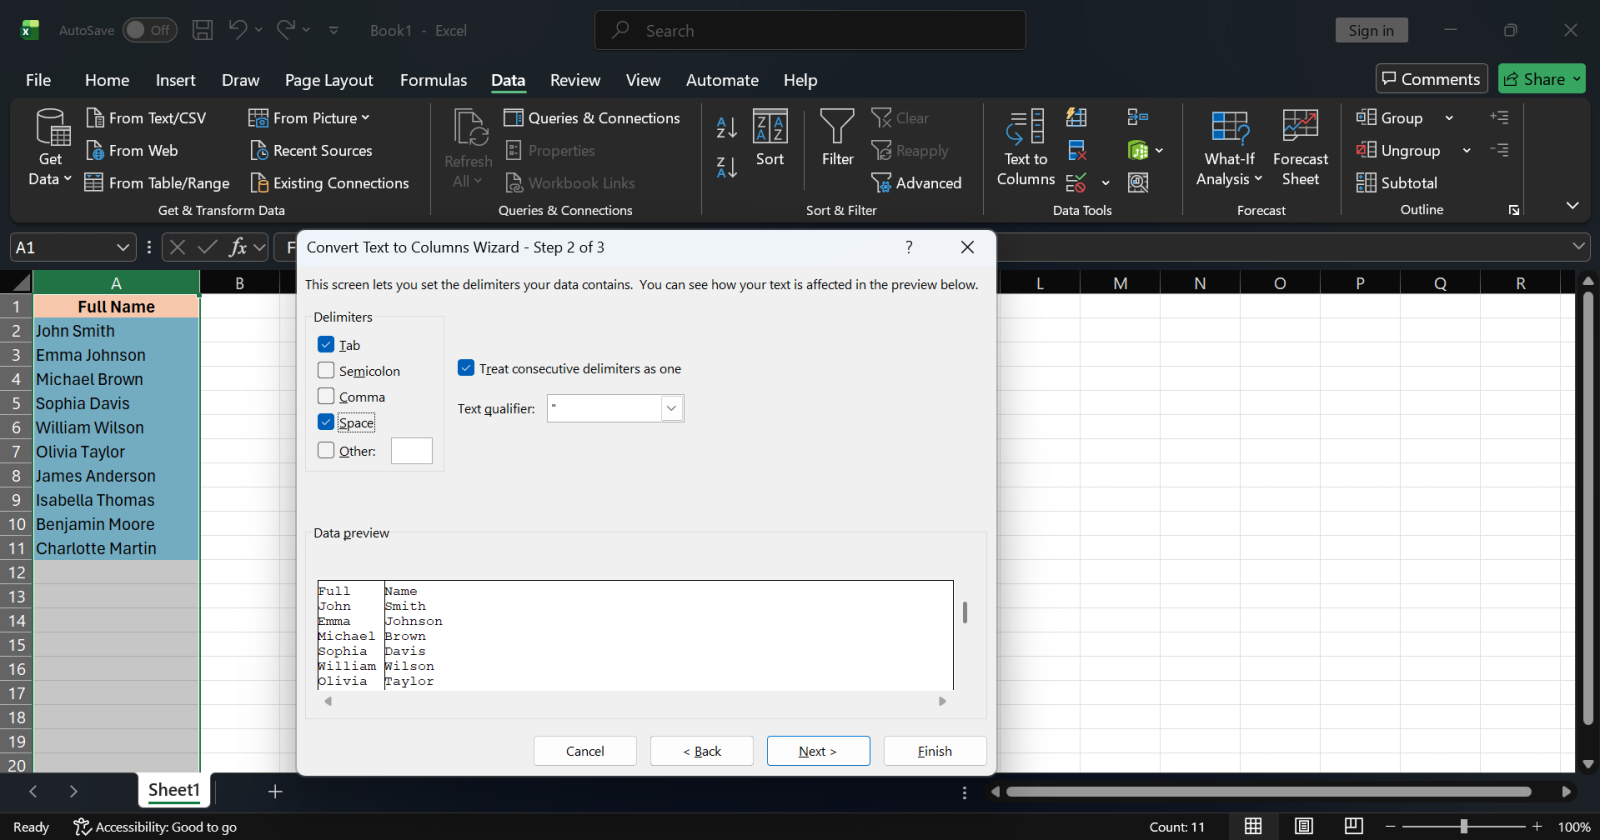
Also Read: Power Automate Tutorial For Beginners
6. Choose the Destination cell (e.g., B1 to output first names starting in column B) → click Finish.
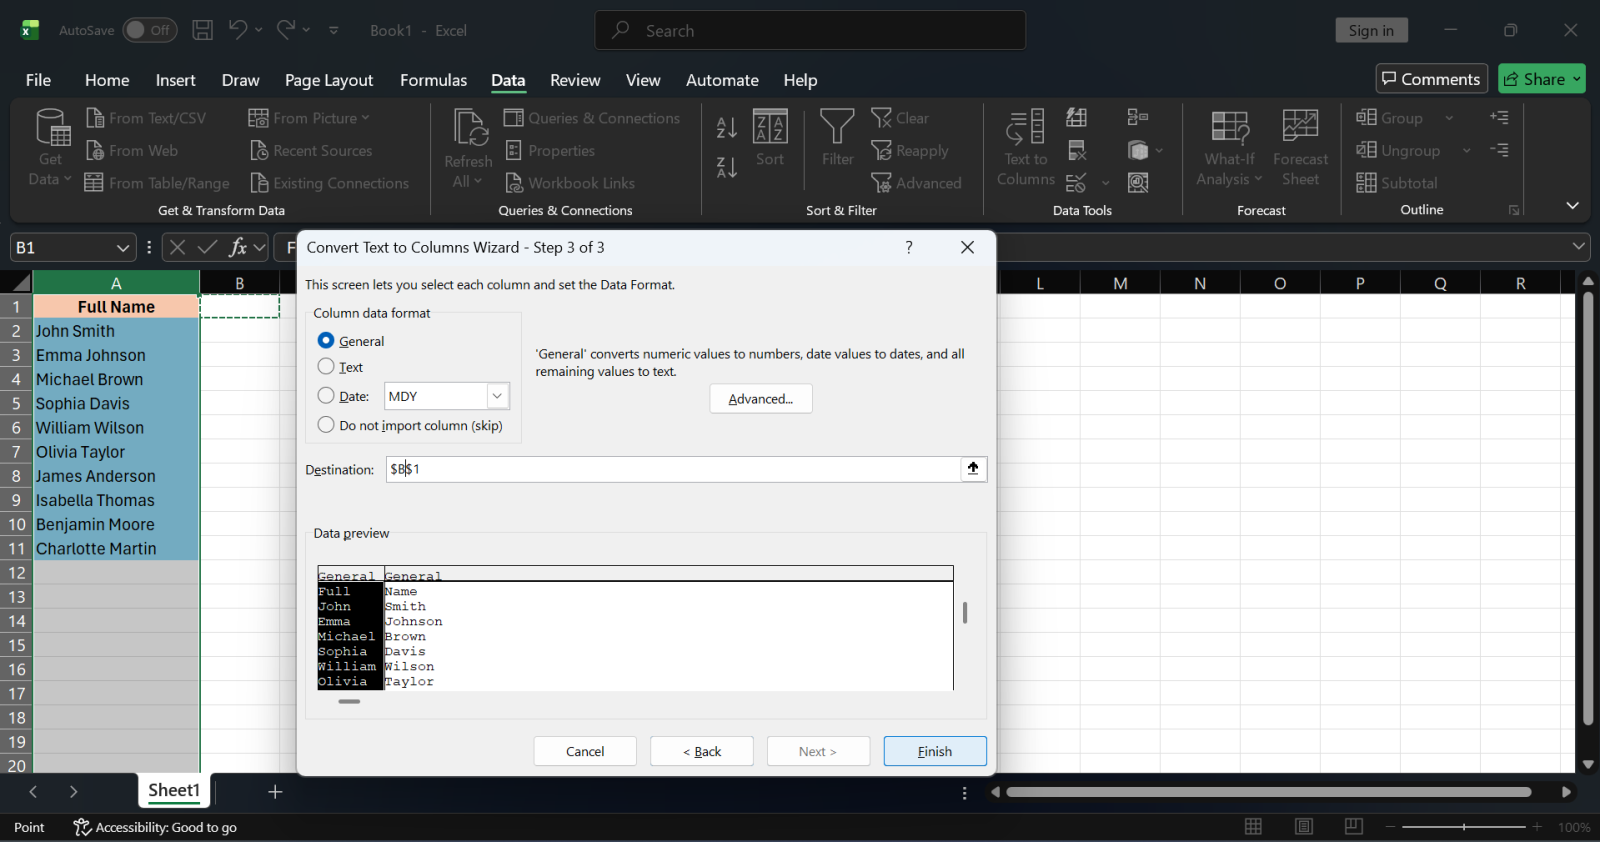
7. You will see the result like this:
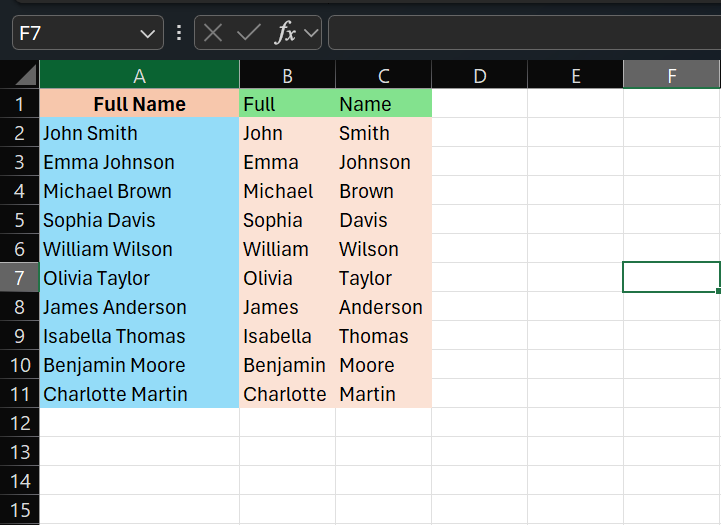
Excel splits the names across as many columns as there are parts.
Important caveat: Text to Columns overwrites whatever is already in the destination columns. Always insert blank columns first. Also, it is a one-time operation, if your source data changes, you need to run it again. For a dynamic, auto-updating solution, use formulas instead (see Methods 3 and 4).
Handling "Last, First" format: At Step 2, check both Comma and Space under Delimiters, and tick Treat consecutive delimiters as one. This handles the comma-space combination cleanly.
Best for: First Last or Last, First name formats where all names follow the same structure.
Related Article: How to Create Dashboard in Excel? A step-by-step Guide
Flash Fill (available since Excel 2013) is one of Excel's most underused features. It learns patterns from your manual input and automatically fills the remaining cells to match.
1. In the cell next to your first full name (e.g., B2), manually type just the first name, for example, if A2 contains "John Smith", type John in B2.
2. Press Enter to move to B3.
3. Start typing the first name from A3. Excel will detect the pattern and suggest the rest of the column in grey.
4. Press Enter to accept, or go to the Data tab → click Flash Fill (or press Ctrl+E).
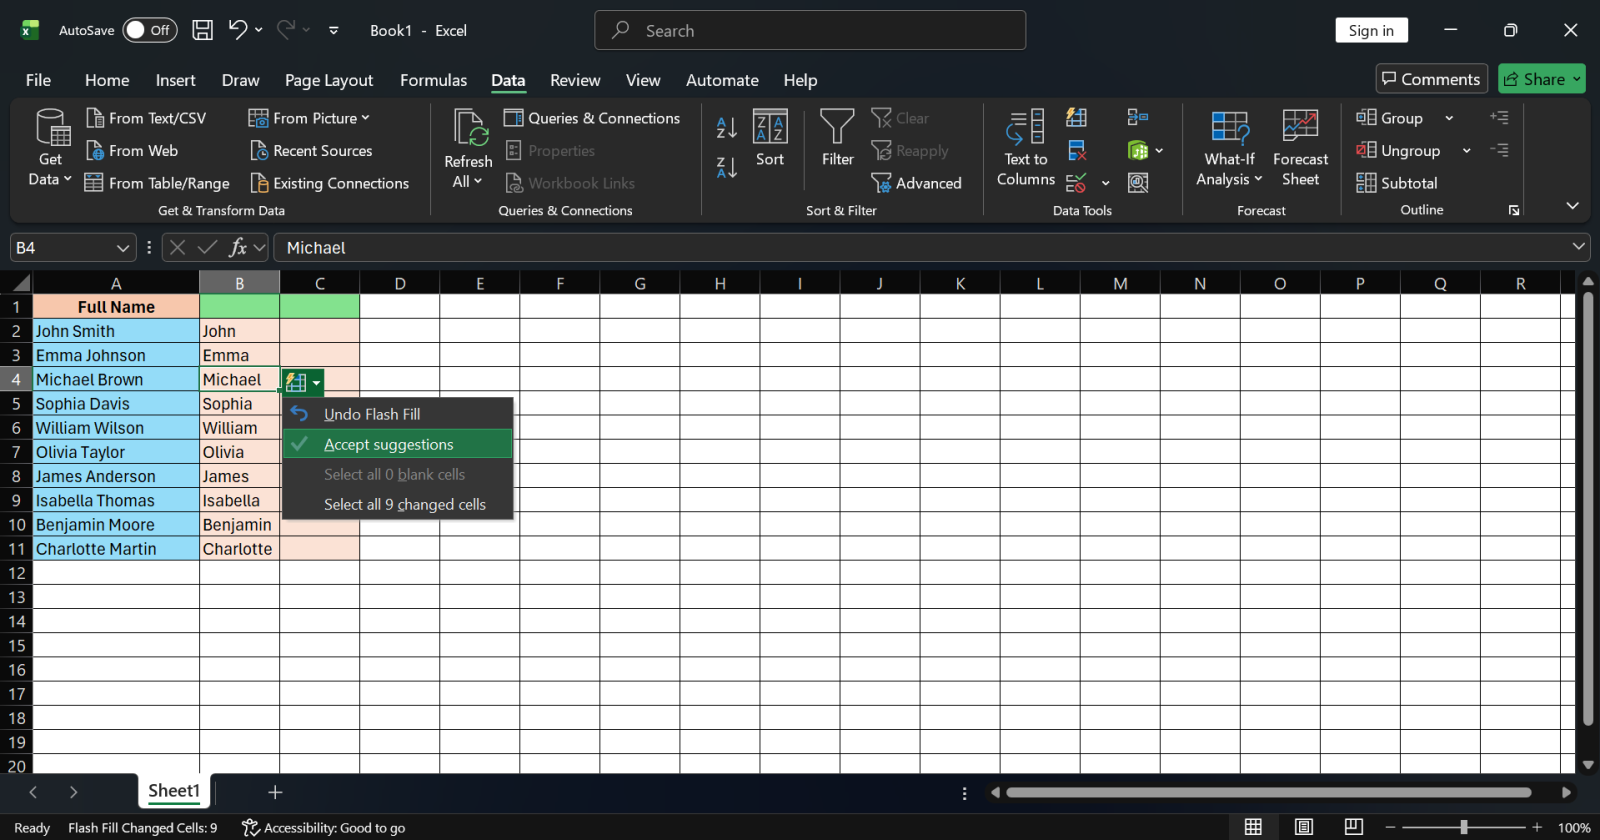
Read Also: What is Power Query?
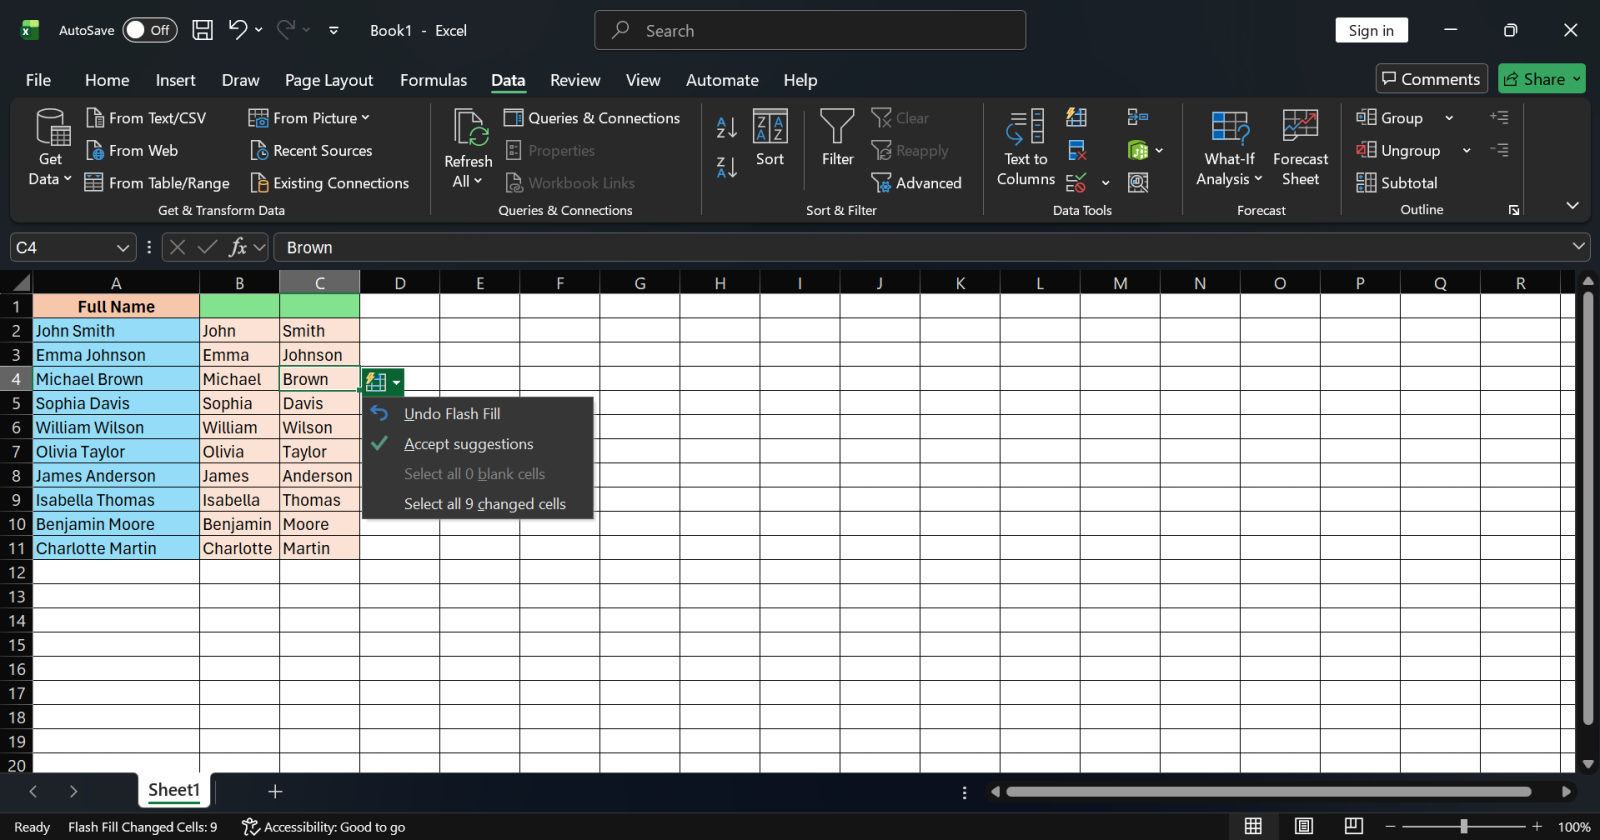
When Flash Fill gets it wrong: If your names are inconsistent (some have middle names, some do not; some have suffixes), Flash Fill may misidentify the pattern. Always review the filled results before using the data further.
Tip: If Flash Fill does not trigger automatically, go to File → Options → Advanced and make sure Automatically Flash Fill is checked under Editing Options.
Best for: Quick one-off separations when names follow a consistent pattern, and you want zero formula complexity.
Also Read: How to Compare Two Columns in Excel?
For datasets that update over time, formulas are the best approach. They are dynamic, when the source name changes, the extracted first and last name update automatically.
Using TEXTBEFORE (Excel 365 / Excel 2021 and later):
| Formula |
=TEXTBEFORE(A2, " ") |
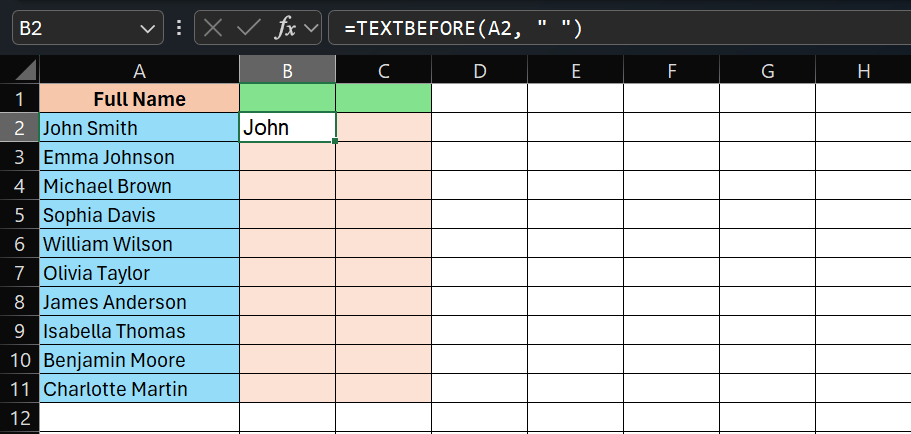
This returns everything before the first space, the first name. Simple, readable, and modern.
Using LEFT + FIND (works in all Excel versions):
| Formula |
=LEFT(A2, FIND(" ", A2) - 1) |
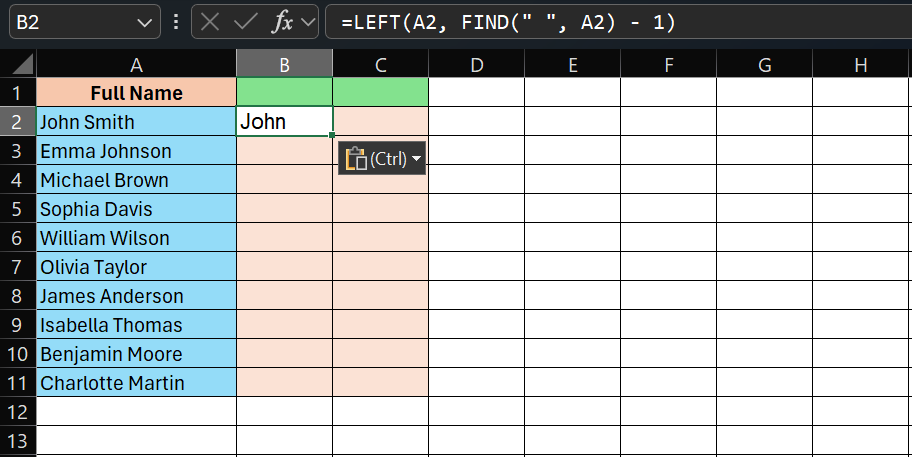
How it works:
Related Article: How to Compare Two Columns in Excel?
Using TEXTAFTER (Excel 365 / Excel 2021 and later):
| Formula |
=TEXTAFTER(A2, " ") |
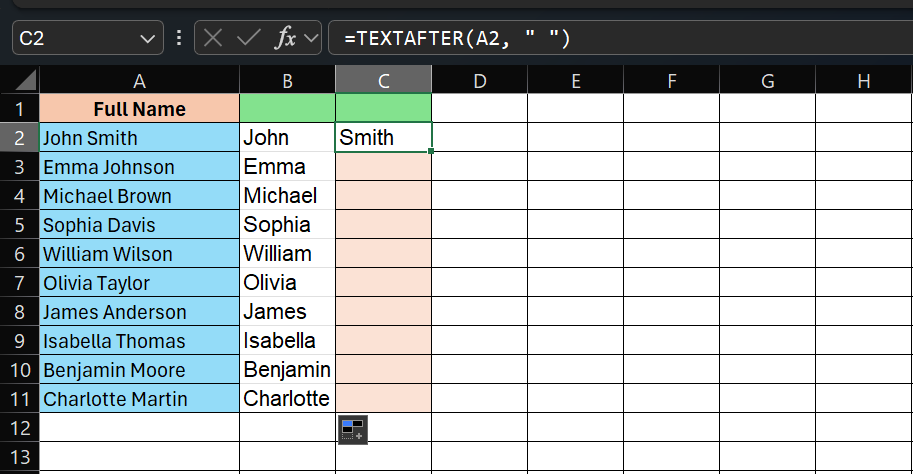
Returns everything after the first space, the last name (or everything after the first word).
Using RIGHT + LEN + FIND (works in all Excel versions):
| Formula |
=RIGHT(A2, LEN(A2) - FIND(" ", A2)) |
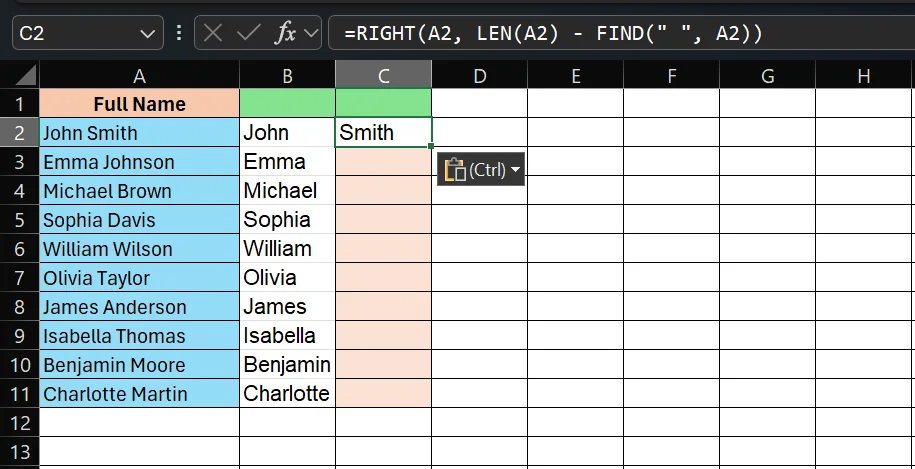
Also Read: XLOOKUP() vs. VLOOKUP()
How it works:
When names are stored as "Smith, John":
First name (everything after the comma and space):
| Formula |
=RIGHT(A2, LEN(A2) - FIND(" ", A2)) |
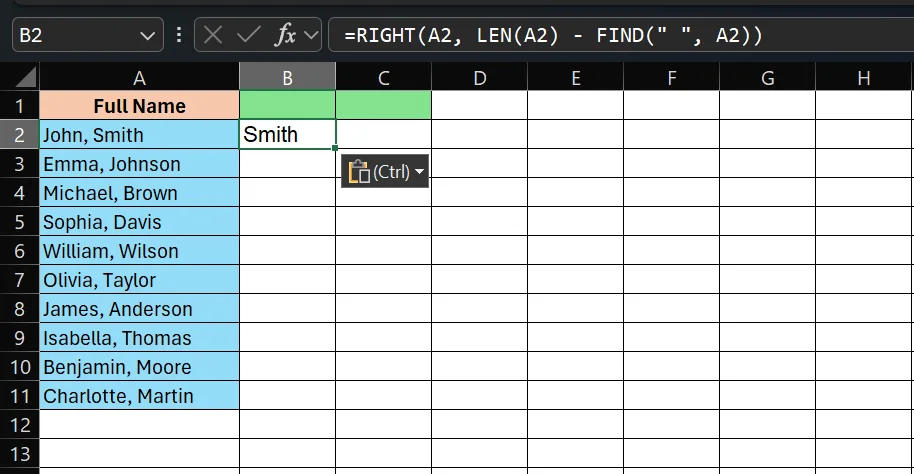
Last name (everything before the comma):
| Formula |
=LEFT(A2, FIND(",", A2) - 1) |
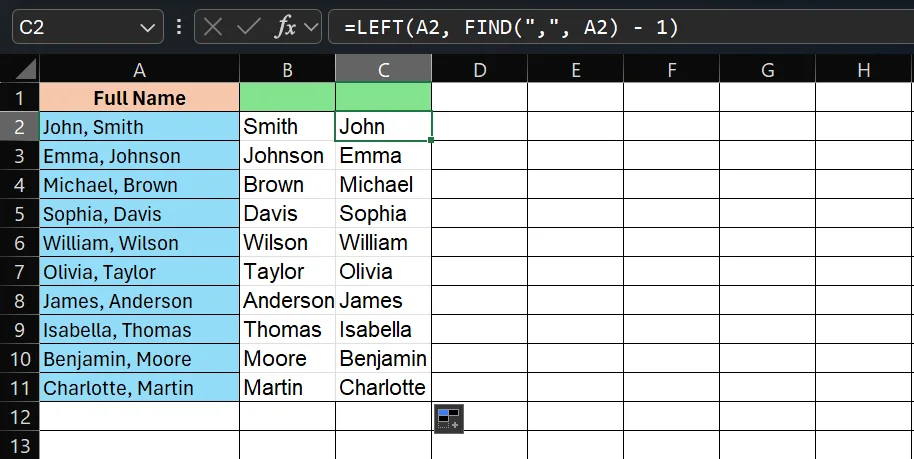
Related Article: How to Remove Spaces in Excel?
Middle names are where most simple formulas break. When you have "Arjun Kumar Singh," a basic TEXTAFTER(A2, " ") returns "Kumar Singh", not just the last name.
The first name formula is unchanged; it always returns the first word:
Using LEFT + FIND:
| Formula |
=LEFT(A2, FIND(" ", A2) - 1) |
Or:
| Formula |
=TEXTBEFORE(A2, " ") |
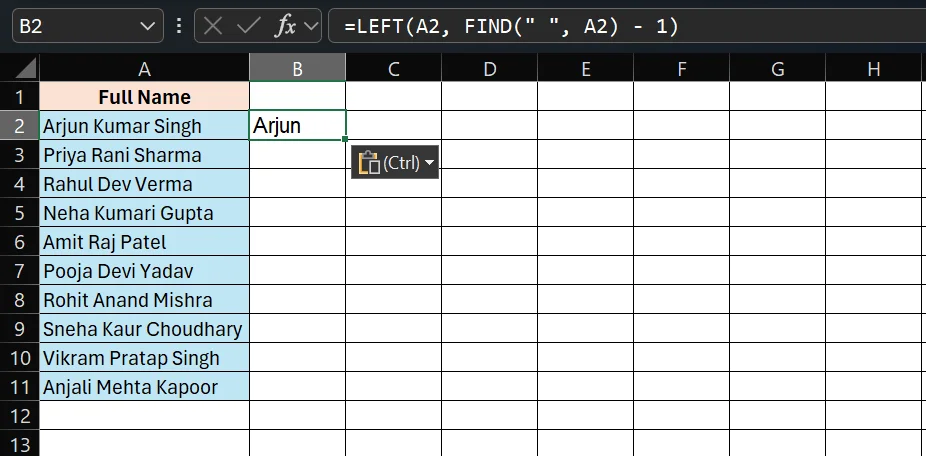
Read Also: Top 10 In-Demand Microsoft Certifications
| Formula |
=MID(A2, FIND(" ", A2) + 1, FIND(" ", A2, FIND(" ", A2) + 1) - FIND(" ", A2) - 1) |
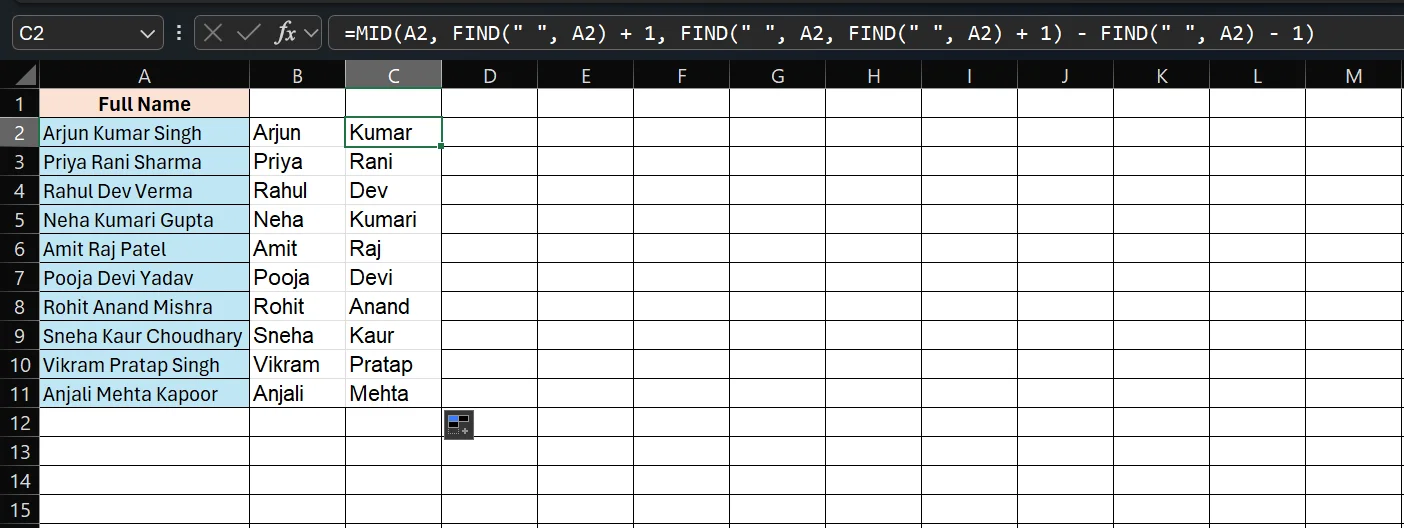
How it works:
| Formula |
=RIGHT(A2, LEN(A2) - FIND(" ", A2, FIND(" ", A2) + 1)) |
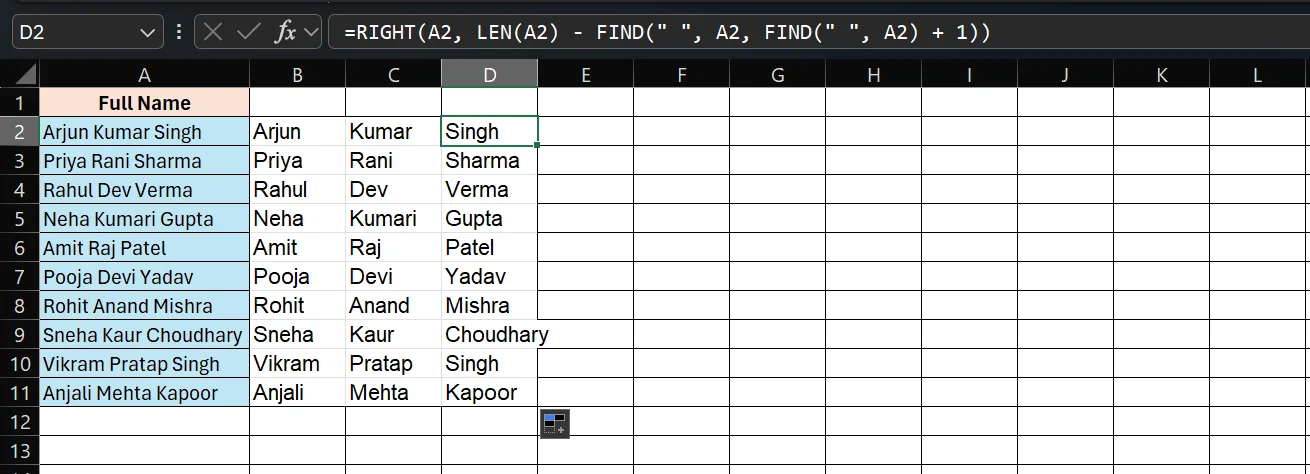
Also Read: CALCULATE Function in Power BI
How it works: Finds the second space in the string (between middle and last name) and extracts everything to the right of it.
Or using TEXTAFTER in Excel 365:
| Formula |
=TEXTAFTER(A2, " ", 2) |
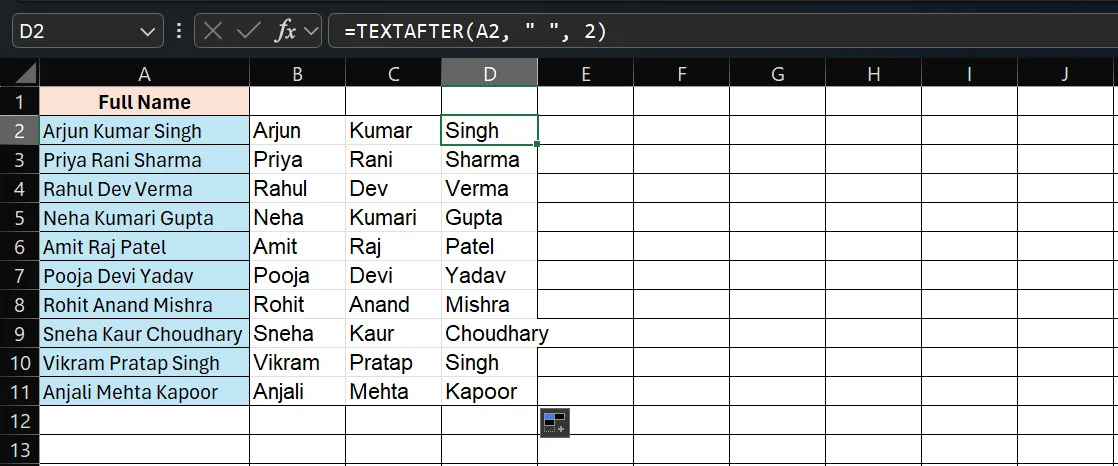
The 2 tells TEXTAFTER to return everything after the second space, clean and simple.
Also Read: Excel Formulas (Basic to Advanced)
If you are using Excel 365 or Excel 2021, the TEXTSPLIT function is the most elegant solution. It splits a text string into an array of parts based on a delimiter, all in one formula.
Syntax:
| Syntax |
=TEXTSPLIT(text, col_delimiter, [row_delimiter]) |
Example, Split "John Smith" into two cells:
| Formula |
=TEXTSPLIT(A2, " ") |
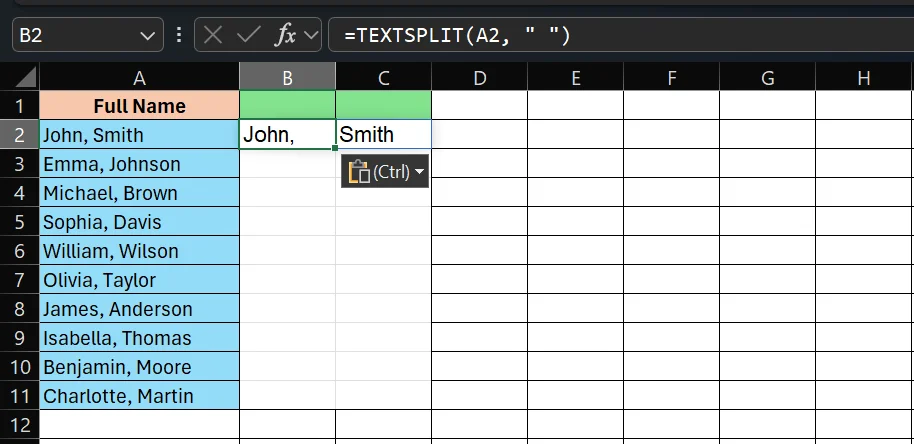
Read Also: Pivot Table in Excel
This returns an array: {"John", "Smith"}, automatically spilling across adjacent cells to the right.
For a three-part name like "Arjun Kumar Singh":
| Formula |
=TEXTSPLIT(A2, " ") |
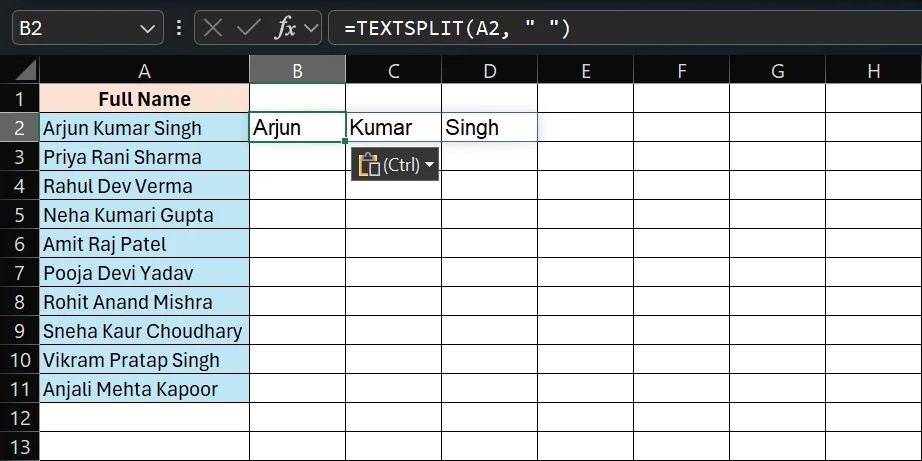
Returns: {"Arjun", "Kumar", "Singh"}, spilling across three cells automatically.
Important: TEXTSPLIT uses Excel's dynamic array feature. The result spills automatically into as many columns as there are parts. Make sure the cells to the right of your formula are empty, or you will get a #SPILL! error.
Why use TEXTSPLIT over other methods?
Related Article: How to Calculate Age in Excel?
For large datasets that refresh regularly, such as monthly contact lists, HR records, or CRM exports, Power Query offers the most scalable and repeatable approach.
Steps:
The big advantage: Once you set this up, you can refresh the query with one click whenever new name data arrives, no re-running formulas, no re-doing Text to Columns.
| Method | Best For | Formula Required? | Handles Middle Names? | Dynamic? |
|---|---|---|---|---|
| Text to Columns | Consistent data, one-time clean-up | No | Yes (splits all parts) | No |
| Flash Fill | Quick splits, simple patterns | No | Sometimes | No |
| LEFT / RIGHT + FIND | All Excel versions, live formulas | Yes | Needs extra formula | Yes |
| TEXTBEFORE / TEXTAFTER | Excel 365/2021, clean syntax | Yes | Yes (with instance number) | Yes |
| TEXTSPLIT | Excel 365, any number of name parts | Yes | Yes (automatic) | Yes |
| Power Query | Large/refreshing datasets | No (GUI-based) | Yes | Yes (on refresh) |
Here are some of the common mistakes beginners should avoid. It will help you become proficient in not time.
=TRIM(A2) to remove extra spaces before applying name-splitting formulas.Also Read: KPI in Power BI: Key Performance Indicators Dashboards
Separating names is often part of a larger data cleaning workflow. Once you have mastered this, explore these connected Excel skills:
To build these skills professionally, explore these resources from IGMGuru:
Separating names in Excel is a task every data professional encounters regularly. For quick, one-time splits on clean data, Text to Columns or Flash Fill gets the job done in seconds. For datasets that change over time or contain mixed formats, formula-based approaches using LEFT, RIGHT, FIND, TEXTBEFORE, TEXTAFTER, or TEXTSPLIT give you a dynamic, scalable solution. And for large, regularly refreshing datasets, Power Query is the professional-grade answer.
The key is matching the right method to your data's structure and your workflow's needs. With all the options covered in this guide, you are equipped to handle any name-splitting scenario Excel throws at you.
Read Also: How To Become A Power BI Developer?
For clean, consistent data, Text to Columns (Data → Text to Columns → Delimited → Space) is the fastest method, no formulas required. For a more intelligent pattern-based approach with no setup, Flash Fill (Ctrl+E) is even quicker for small datasets.
Use =TEXTBEFORE(A2," ") for the first name and =TEXTAFTER(A2," ") for the last name in Excel 365 or 2021. In older versions, use =LEFT(A2, FIND(" ",A2)-1) for the first name and =RIGHT(A2, LEN(A2)-FIND(" ",A2)) for the last name.
Use =TEXTBEFORE(A2," ") for the first name, =MID(A2, FIND(" ",A2)+1, FIND(" ",A2,FIND(" ",A2)+1)-FIND(" ",A2)-1) for the middle name, and =TEXTAFTER(A2," ",2) for the last name (Excel 365). In all versions, TEXTSPLIT is the cleanest single-formula option: =TEXTSPLIT(A2," ").
For the last name: =LEFT(A2, FIND(",",A2)-1). For the first name: =RIGHT(A2, LEN(A2)-FIND(" ",A2)). This extracts everything before the comma as the last name, and everything after the space as the first name.
Flash Fill matches the pattern from your first few manually entered examples. If the pattern is inconsistent across your data (e.g., some names have middle names and some do not), Flash Fill may apply the wrong logic. Review every result before using the data, or switch to a formula-based approach.
A #SPILL! error means the cells where TEXTSPLIT wants to place its results are not empty. Clear all cells to the right of the formula cell in the same row, and the error will resolve automatically.
Yes. With any formula method, the original full name column stays untouched and the extracted parts appear in new columns. With Text to Columns, the original column is overwritten, so copy it to a safe location first, or work on a copy of your data.