
Preparing for a React Native interview can feel challenging, especially with the wide range of topics companies expect developers to understand. Whether you are a beginner starting your mobile app development journey or an experienced developer looking to refresh your knowledge, understanding the most commonly asked React Native interview questions can help you build confidence and improve your performance.
In this guide, we have compiled important React Native interview questions and answers covering core concepts, components, navigation, state management, performance optimization, APIs, and advanced development topics. These questions will help you strengthen your technical skills and prepare effectively for frontend and mobile app development interviews.
Explore igmGuru's React Native Training to accelerate your career growth.
The first segment contains commonly asked basic React Native interview questions and answers. These React Native questions are highly deemed and definitely some of the most frequently asked ones.
React is one of the most popular JavaScript (JS) libraries. It is used extensively for building user interfaces (UIs), especially for web applications. React Native, on the contrary, is a popular framework. It employs React to build native mobile applications. React employs CSS and HTML, whereas React Native employs APIs and native components.
props is the short form for properties. These are utilized to stream data from a parent component to a child component. state is employed for managing dynamic data that has an effect on the rendering of components. state is managed within the component, where props are immutable and offered by the parent.
Flexbox refers to a layout model. It is utilized for designing flexible and responsive layouts. In React Native, it is used for aligning and positioning components. Some of its main properties are justifyContent, flexDirection, flex and alignItems.
ScrollView displays a horizontal or vertical scrollable view, which is apt for smaller lists of items. FlatList, however, is optimized especially for large lists of data. It offers performance improvements and efficient rendering via the recycling of views and lazy loading.
Expo pertains to a platform and framework for universal React apps. It contains a suite of tools built especially around React Native. This set of tools aid developers in building, deploying, and iterating faster on the apps. Expo offers a managed workflow with many pre-configured services and libraries to simplify development.
The central components of React Native are -
Styling components in React Native is done by using JavaScript objects. These are created via the StyleSheet API.
The useEffect hook enables the performing side effects in functional components. These include setting up subscriptions, manually updating the DOM and fetching data. A function is taken as an argument, which gets executed once the component is rendered. Dependencies can also be specified to control when the effect should be re-run.
React Native uses a layered architecture that allows developers to build mobile applications using JavaScript while still rendering native UI components. It enables cross-platform development by allowing a single codebase to run on both Android and iOS.
Traditionally, React Native used a Bridge architecture where communication between JavaScript and native modules happened asynchronously through a bridge. JavaScript logic ran on the JS thread, while native UI components were rendered on the native thread. The bridge serialized messages in JSON format and passed them between the two environments.
However, modern versions of React Native introduced a New Architecture that improves performance and removes the limitations of the bridge. The new architecture includes the following components:
JSI allows direct communication between JavaScript and native code without using the bridge. This eliminates JSON serialization and significantly improves performance.
TurboModules load native modules lazily, meaning they are initialized only when required instead of loading all modules at application startup. This reduces memory usage and improves startup speed.
Fabric is the new UI rendering system in React Native. It enables faster rendering, better concurrency support, and smoother UI updates.
Hermes is a lightweight JavaScript engine optimized for React Native applications. It improves app startup time, reduces memory consumption, and enhances overall performance, especially on low-end devices.
With the combination of JSI, TurboModules, Fabric, and Hermes, modern React Native applications achieve better performance, improved scalability, and more efficient communication between JavaScript and native layers.
The React Native bridge helps in building communication between native code and JavaScript. It serializes all JSON messages. After this, they are passed between the native thread and the JavaScript thread. This enables JS to call native modules easily and vice versa.
Traditionally, React Native used the asynchronous Bridge for communication between JavaScript and native modules. However, the modern React Native architecture replaces the Bridge with the JavaScript Interface (JSI), which enables direct synchronous calls between JavaScript and native code, improving performance and reducing overhead.
JavaScript XML is a code similar to HTML that makes it easy to create a user interface with React. The similarity does not make it an HTML code, it is basically a syntax extension of JavaScript. It embeds JavaScript expressions in the code to simplify the rendering of dynamic content. There is no necessity of using JSX, but it makes it easier to create react applications.
The component involves many phases including mounting, updating, and unmounting. In React Native, the component lifecycle includes mounting, updating, and unmounting phases. During the mounting phase, components are created and rendered using native UI components such as View and Text rather than a browser DOM. Updating occurs when props or state change, triggering a re-render. Unmounting happens when a component is removed from the screen and resources are cleaned up. The updating phase involves getting new states or props and updates accordingly. In the unmounting phase, we remove the component from the DOM.
Keys are the very basic and most important attributes in a list. They are unique identities that help in finding a particular element from a list. It is very useful in re-rendering elements when any modifications are done in a list. This improves performance and prevents rendering glitches.
Yes, it is of course a possible task. It requires using a third-party library like Axios or the fetch API.
AsyncStorage is an easy-to-use, permanent, unencrypted and asynchronous storage system. It uses key-value pairs to store data across the whole application. There are some limitations of using this storage method like security and space. AsyncStorage is designed for storing small amounts of non-sensitive data such as app preferences, cached state, or settings.
Related Article- A Comprehensive Guide to Learn React Native
This segment contains the top intermediate React Native interview questions and answers. It consists of some of the important terms like animation, SDKs and native modules as well as processes to elements and manages them. It is best to show your potential.
A new React Native project is created through the React Native CLI. npx react-native init ProjectName is run here. Alternatively, Expo can be used, which is a platform and framework for universal React apps. This is by running npx create-expo-app ProjectName.
FlatList handles simple lists, while SectionList handles lists with section headers. Every component is optimized to handle gigantic datasets as only visible items are rendered. FlatList creates Grids with the numColumns prop.
The following techniques can optimize the performance of these applications -
State management is handled in large React Native apps by utilizing libraries such as MobX, Context API or Redux. These tools aid in the management and centralization of the app state. This renders it easier to debug and maintain. Redux offers a more predictable state container, whereas MobX leans towards a reactive approach.
Animations are handled in React Native by employing the Animated API. It offers a compilation of methods and components for creating smooth animations. Different libraries such as react-navigation and react-native-reanimated also provide many advanced animation capabilities.
Integration of native SDKs revolves around inserting the SDK to native project files (for instance, Gradle for Android and through CocoaPods for iOS). Writing a React Native bridge for exposing SDK functionalities to JS, handling platform-specific configurations and permissions, and guaranteeing correct lifecycle management and initialization are key steps. The top examples here are integrating Firebase, analytics SDKs and payment gateways.
Third-party native modules are easily integrated in a React Native project by utilizing yarn or npm. In modern React Native versions (0.60+), most third-party native modules are integrated automatically using Auto Linking. Developers simply install packages using npm or yarn and React Native automatically links them with Android and iOS projects. Additionally, manual linking in native project files (for instance, iOS/Podfile and Android/settings.gradle) is also used. Other parts of the process are handling native dependencies, writing custom native modules when needed and guaranteeing compatibility with both platforms.
Some typical issues that arise during upgrades are
These can be addressed by reading the upgrade guide thoroughly, testing extensively, using tools such as react-native-upgrade-helper, sometimes contributing patches to third-party libraries and fixing breaking changes incrementally.
Navigation can easily be handled via React Navigation, which offers a brilliant set of navigators such as tab, drawer and stack. Configuration is needed for deep linking in both React Navigation and the native code. This includes setting up intent filters for Android and URL schemes for iOS, along with handling incoming links in the app's entry point. These help in navigating to the corresponding screen.
A bridge is used in React Native architecture to enable communication between native code and JavaScript. The bridge easily serializes JSON messages and then passes them asynchronously between JS threads and native threads. This enables JS to invoke native modules and the other way around.
To implement a custom native module, create a bridge between native code and JavaScript. For Android, this incorporates crafting a Java module extending ReactContextBaseJavaModule and then registering it in a package class where ReactPackage is implemented. For iOS, this incorporates crafting a Swift class or Objective-C where RCTBridgeModule is implemented. It's then registered in the bridging header. The module methods are consequently exposed to JS via NativeModules.
shouldComponentUpdate refers to a lifecycle method. It cements if a component should re-render against state or prop changes or not. It prevents costly re-renders by returning false when updates are not needed, thus optimizing performance. React.memo serves a mirroring purpose in functional components by memoizing the component as well as skipping re-renders in case the props are unchanged.
Integrating WebViews in React Native includes the utilization of the react-native-webview library. This enables embedding web content within the application. Considerations include handling communication and navigation between the React Native app and the WebView through post messages or injected JavaScript. This ensures security by dodging unsafe content and performance optimization by controlling WebView loading and caching.
Performance optimization for animations is achieved by employing the Animated API, along with libraries like react-native-reanimated. These present more performant animations since they directly run them on the native thread. There are other strategies like -
const capitalizeWords = (str) => { return str.replace(/\b\w/g, char => char.toUpperCase()); }; console.log(capitalizeWords("hello world")); // "Hello World" |
Read Also- React Native Tutorial For Beginners
Here is a list of the top advanced React Native interview questions and answers. As mentioned above, preparation is equally important for both experienced and novice aspirants. These questions will help you prepare better.
Smooth animation is crucial for an application to perform well. The most effective way to build a smooth animation is to use the React Native Reanimated library. This library runs animation on the native UI thread, giving fine-grained control over them.
This ensures a seamless user experience. It has two important elements, including useSharedValue for dynamic animation state and useAnimatedStyle to apply styles to our components.
InteractionManager.runAfterInteractions(() => { // ...long-running synchronous task... }); |
SSL pinning is the practice of pinning a server certificate within an application. This server certificate acts like a key that directly redirects the clients to the accurate server. There are some third-party servers that can affect the security, it avoids them all. The following are the main reasons behind using this practice.
This framework uses an asynchronous, unencrypted and permanent storage system, which is not suitable for sensitive information like credentials. Therefore, we have to use some other options. Sensitive data should not be stored in AsyncStorage. Instead, developers should use secure storage solutions such as iOS Keychain, Android Keystore, Expo SecureStore, or libraries like react-native-keychain to protect authentication tokens and confidential data. The Keychain is used in iOS, whereas the other two are used in Android.
It requires the use of a third-party error reporting integration that can diagnose the bug and pull up an error report. This plugin collects, organizes, and analyzes crash reports. It also provides quick fixes to the app so it can get back up and perform better. The following are the popular reporting plugins -
While Flexbox generally operates similarly across React Native and web browsers, there are some key distinctions. The table given below shows the differences -
| Feature | React Native | Browser (CSS) |
| Default flexDirection | column | row |
| Default flexShrink | 0 (items don't shrink) | 1 (items shrink) |
| Property Naming | camelCase (e.g., flexDirection) | kebab-case (e.g., flex-direction) |
| alignItems Default Behavior | Varies, best to be explicit | stretch (column), flex-start (row) |
| margin: auto | Limited support, doesn't work for centering as in CSS | Full support for automatic margin distribution and centering |
| Flexbox Specification | Subset of the web specification | Full or near-full implementation of the web specification |
| Values | Some value differences. | Standardized values. |
Persistent memory leak occurs if any memory remains on the app without its requirements. It is one of the common issues affecting the performance of applications. It is initially managed by the garbage collectors, but still there might be some errors. This is where we need to use the debugging tools to identify the root cause of the error.
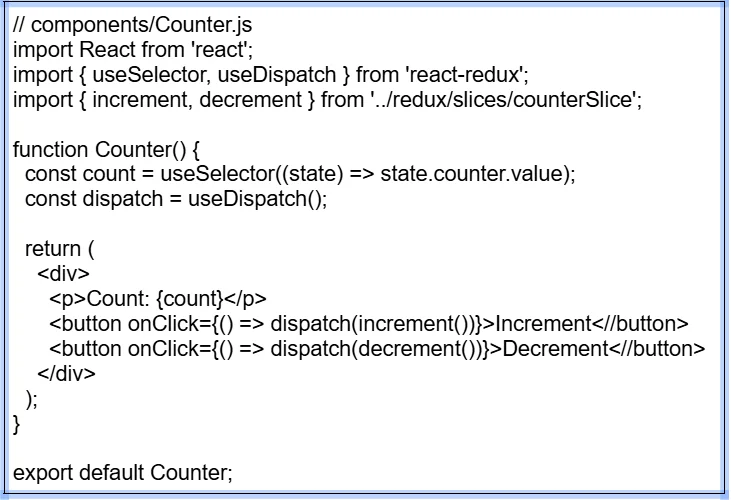
Redux manages the states in this framework. We can implement it through the following steps -
npm install @reduxjs/toolkit react-redux # or yarn add @reduxjs/toolkit react-redux |
src/ redux/ store.js slices/ counterSlice.js |
// src/redux/slices/counterSlice.js import { createSlice } from '@reduxjs/toolkit'; const counterSlice = createSlice({ name: 'counter', initialState: { value: 0, }, reducers: { increment: (state) => { state.value += 1; }, decrement: (state) => { state.value -= 1; }, }, }); export const { increment, decrement } = counterSlice.actions; export default counterSlice.reducer; |
// src/redux/store.js import { configureStore } from '@reduxjs/toolkit'; import counterReducer from './slices/counterSlice'; const store = configureStore({ reducer: { counter: counterReducer, }, }); export default store; |
// App.js import React from 'react'; import { Provider } from 'react-redux'; import store from './redux/store'; import Counter from './components/Counter'; // example component function App() { return ( <Provider store={store}> ); } export default App; |
It is a powerful library that can add a variety of icons to a React Native app. This practice boosts design and user experience. There are many options for icons, some of the popular ones are FontAwesome, Material Icons, Ionicons, etc. Using this library in an instance involves multiple steps including -
A) Installing the library.
npm install react-native-vector-icons Or yarn add react-native-vector-icons |
B) Configuring the fonts.
# for Android
react { ... project.ext.vectoricons = [ iconFontNames: ['MaterialCommunityIcons.ttf', 'FontAwesome.ttf', 'AntDesign.ttf'] // Add other font files as needed ] apply from: "../../node_modules/react-native-vector-icons/fonts.gradle" ... } |
# for iOS
UIAppFonts MaterialCommunityIcons.ttf FontAwesome.ttf AntDesign.ttf |
C) Configuring the react-native.config.js.
// react-native.config.js module.exports = { project: { ios: {}, android: {}, }, dependencies: { 'react-native-vector-icons': { platforms: { ios: null, // Disable auto-linking for iOS to avoid font duplication issues }, }, }, // assets: ['./src/assets/fonts/'], // Custom font path }; |
D) Run the terminal
npx react-native-asset |
E) Using Icons
import Icon from 'react-native-vector-icons/MaterialCommunityIcons'; const MyComponent = () => ( ); |
There are some instances where we have to create multiple reducers. These are mostly used when we have to perform many actions. In this case, it is important and complicated to manage them in the Redux store. The combineReducers function is the best solution for this instance. This way we can combine many reducers into a single unit.
SYNTAX:
import { combineReducers } from "redux"; const rootReducer = combineReducers({ books: BooksReducer, activeBook: ActiveBook }); |
We can use setState that solves most of the potential bugs up front. We have to create functions in this case, as given below -
this.setState(st => { return( st.stateName1 = state1UpdatedValue, st.stateName2 = state2UpdatedValue ) }) |
Read Also- Python Interview Questions and Answers
Being a leading framework, React Native experts need to have coding knowledge. That is why these React Native coding interview questions play an imperative role. When studying the top React Native interview questions, make sure to revise coding questions too.
Here is the code-
import styled from 'styled-components' const Button = styled.div` width : 100px ; cursor: pointer ; text-decoration : none; ` export default Button; |
Here is the program you can explain-

Here is the code-
Here is the code-
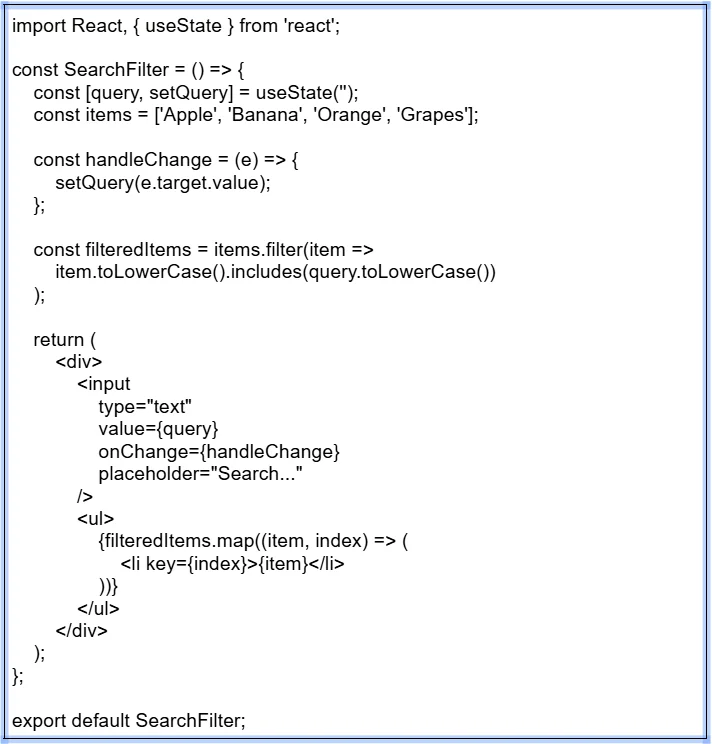
import React from 'react'; const ItemList = () => { const items = ['Apple', 'Banana', 'Orange', 'Grapes']; return ( {items.map((item, index) => ( {item} ))} ); }; export default ItemList; |
Here is the code-
Higher-order components, often simply called HOCs, are functions. These take a component and then return a new component having additional behavior or props. They are employed for logic abstraction or code reuse. A perfect example is-
const withLogging = (WrappedComponent) => { return class extends React.Component { componentDidMount() { console.log('Component mounted'); } render() { return ; } }; }; const EnhancedComponent = withLogging(MyComponent); |
Here is the code-
import { useState, useEffect } from 'react'; const useFetch = (url) => { const [data, setData] = useState(null); const [loading, setLoading] = useState(true); const [error, setError] = useState(null); useEffect(() => { const fetchData = async () => { try { const response = await fetch(url); const result = await response.json(); setData(result); } catch (err) { setError(err); } finally { setLoading(false); } }; fetchData(); }, [url]); return { data, loading, error }; }; export default useFetch; |
Here is the code to create a button -
import React, { useState } from 'react'; import { Button, View } from 'react-native'; const ToggleButton = () => { const [isStarted, setIsStarted] = useState(false); const handlePress = () => { setIsStarted((prev) => !prev); console.log(isStarted ? 'Stop' : 'Start'); }; return ( Button title={isStarted ? 'Stop' : 'Start'} onPress={handlePress} /> ); }; export default ToggleButton; |
Here is the code you can explain-
const debounce = (func, delay) => { let timer; return function(...args) { clearTimeout(timer); timer = setTimeout(() => func.apply(this, args), delay); }; }; const log = () => console.log('Debounced!'); const debouncedLog = debounce(log, 1000); |
Here is the code you can explain-
import React, { createContext, useContext, useState } from 'react'; const AuthContext = createContext(); export const AuthProvider = ({ children }) => { const [isAuthenticated, setIsAuthenticated] = useState(false); const login = () => setIsAuthenticated(true); const logout = () => setIsAuthenticated(false); return ( {children} ); }; export const useAuth = () => useContext(AuthContext); |
This list contains the most frequently asked React Native technical interview questions and answers. These are equally important for candidates of every level, irrespective of their experience.
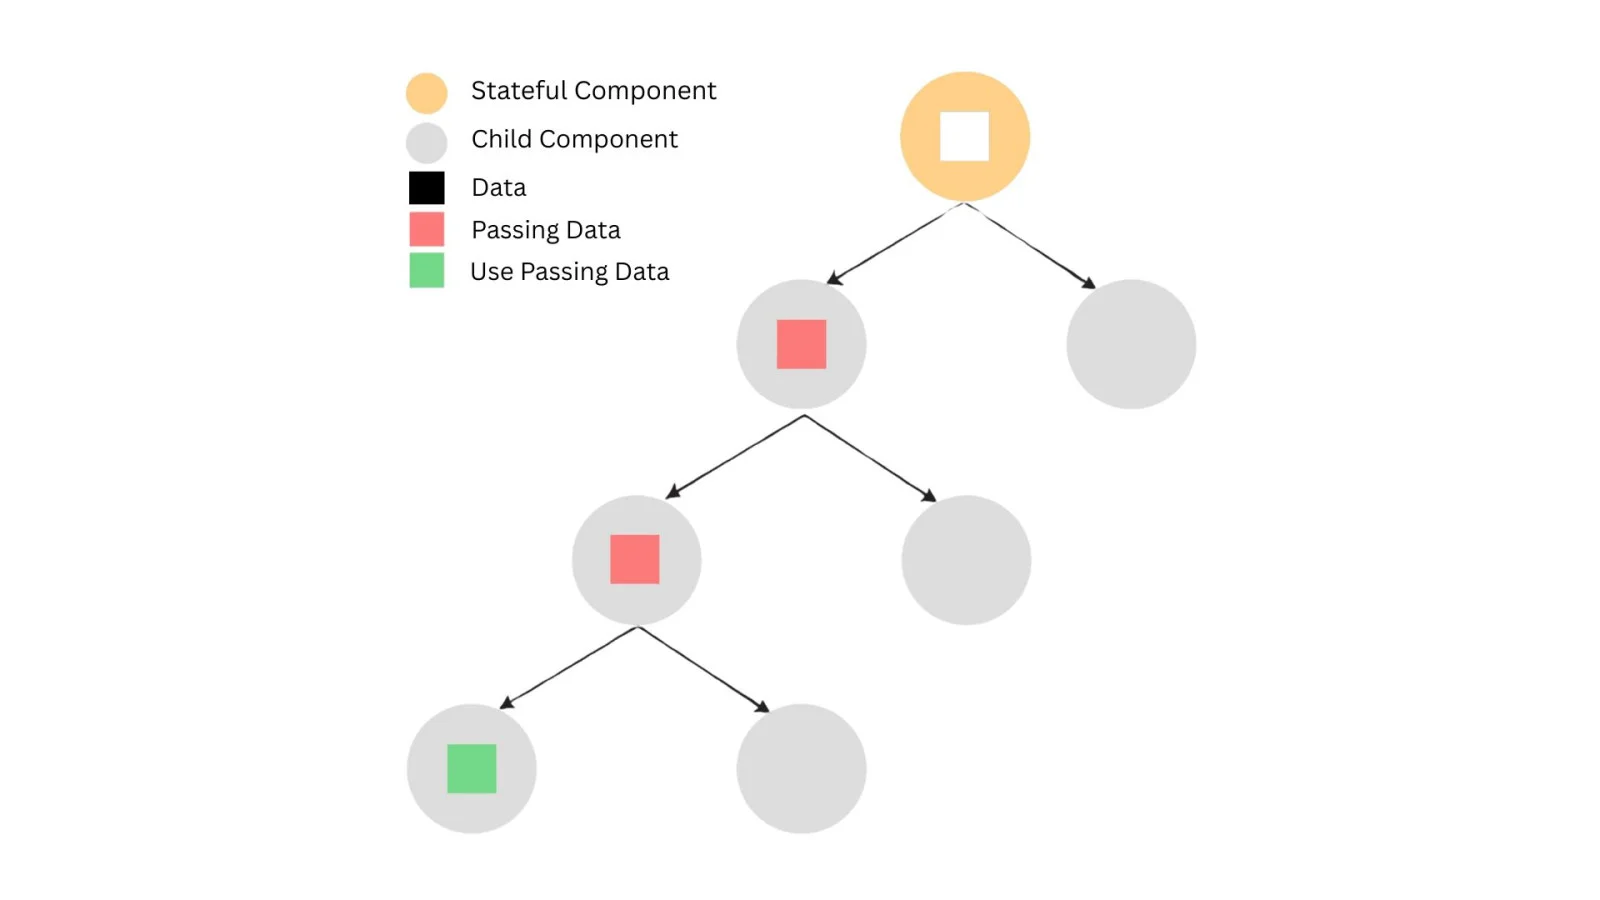
Prop Drilling is a process that passes data down through multiple levels of nested components where only a deep child component requires the data access. This often occurs when an intermediate component does not directly use the passed prop, but simply passes it on to its children.
While straightforward for simple instances, prop drilling can become problematic in complex applications. This leads to increased code complexity and potential performance issues. The following steps are used to avoid Prop Drilling:
Timers are mechanisms that execute code asynchronously after a specified duration or at recurring intervals. They are used in tasks such as animations, API polling, delayed actions and implementing features like stopwatches or countdowns. React Native implements the browser timers that provide functions like setTimeout, setInterval, setImmediate and requestAnimationFrame.
Performance issues mostly occur due to frequent passing on the Native components and JS threads without any requirement. Therefore, reducing the number of passes over the bridge is one of the best solutions to improve performance. The bridge here is the intermediate between JS and Native threads for communication.
class GyroJs { setGyroPosition(pos) { if (pos === null || typeof pos === 'undefined') { throw new Error('The position must be defined'); } this.pos = pos; } constructor() { const gyroscopePosition = NativeModules.MyGyroModule.gyroPosition(); this.setGyroPosition(gyroscopePosition); } } |
This code includes an error where gyroscopePosition will always remain an unresolved Promise. The bridge that connects native code with JavaScript should be asynchronous.
Therefore, we can either get results from passing in a callback, or by returning a Promise. We need to add a then() call in this code to the gyroPosition() call and then set a position inside it. The correct code should be as given below.
import { NativeModules } from 'react-native'; // Ensure NativeModules is imported class GyroJs { constructor() { NativeModules.MyGyroModule.gyroPosition() .then((gyroscopePosition) => { this.setGyroPosition(gyroscopePosition); }) .catch((error) => { console.error('Failed to get gyroscope position:', error); }); } setGyroPosition(pos) { if (pos === null || typeof pos === 'undefined') { throw new Error('The position must be defined'); } this.pos = pos; } } |
Managing user input in React Native involves using the TextInput component along with state management to handle changes. TextInput is the core component that allows one to enter text. It can be done with the code shown below.
import React, { useState } from 'react'; import { Text, TextInput, View } from 'react-native'; const PizzaTranslator = () => { const [text, setText] = useState(''); return ( <View style={{padding: 10}}> style={{height: 40}} placeholder="Type here to translate!" onChangeText={text => setText(text)} defaultValue={text} /> {text.split(' ').map((word) => word && '?').join(' ')}
); } export default PizzaTranslator; |
Async Storage is basically a Local Storage from the internet. It is also referred to as a community-maintained module that provides an unencrypted key-value store. It is not shared between apps as they have their own sandbox environment. They also do not have data access from other apps.
| Use Async Storage in | Don't use Async Storage in |
| Preserving non-sensitive data across app runs | Token storage |
| Persisting Redux state | Secrets |
| Preserving GraphQL state | - |
| Storing global variables | - |
Routing is the process of navigating between different screens or views within an application. Unlike web applications where routing is handled by the browser, React Native requires a dedicated library for managing navigation. Here is the code to import this library.
import * as React from 'react'; import { NavigationContainer } from '@react-navigation/native'; import { createStackNavigator } from '@react-navigation/stack'; const Stack = createStackNavigator(); const MyStack = () => { return ( <NavigationContainer> name="Home" component={HomeScreen} options={{ title: 'Welcome' }} />
); }; |
ListView was an older component used for rendering lists in React Native. However, it has been deprecated and replaced by FlatList and SectionList, which provide better performance through virtualization and efficient memory usage.
Both of these are different on the basis of the following factors:
| Feature | ReactJS | React Native |
| Target Platform | Web browsers | iOS and Android native mobile applications |
| Rendering | Uses Virtual DOM to manipulate the browser DOM | Uses native UI components via a bridge |
| UI Components | HTML-like syntax (JSX) rendering HTML elements | Native UI components (<View>, <Text>, etc.) |
| Styling | CSS stylesheets | Stylesheet object (JavaScript) |
| Navigation | Uses browser navigation or routing libraries | Uses navigation libraries such as React Navigation, Expo Router or third-party navigation libraries |
| Native Features | Limited access to device features | Provides access to native device APIs |
| Code Reusability | Reusable components within web applications | High code reusability across iOS and Android |
| Performance | Can be optimized for web performance | Aims for native-like performance on mobile |
| Learning Curve | Relatively easier for web developers | Easier with prior ReactJS knowledge |
| Ecosystem | Mature and extensive for web development | Growing ecosystem for mobile development |
Imperative and declarative animation approaches differ in how they specify the animation. Imperative animations detail how an animation should occur by providing step-by-step instructions. Declarative animations focus on what should be animated by specifying the desired result without detailing the execution.
Now, we will explore some of the most asked React Native interview questions for senior developers. These will help you advance your career.
React Native’s old architecture used the asynchronous “Bridge” to communicate between JavaScript and native modules. This causes serialization overhead and performance bottlenecks.
The new JSI (JavaScript Interface) removes the bridge and enables direct, synchronous interactions with native code. This improves performance, unlocks TurboModules and Fabric UI Manager. It also allows JS to call native functions without JSON serialization.
TurboModules are the new way of loading native modules lazily using JSI. Instead of loading all modules on startup, TurboModules load them only when needed. This improves startup time, reduces memory consumption, speeds up JS-to-native calls, and enhances overall performance in large apps.
I would use the following strategies:
Hermes is a lightweight JS engine optimized for mobile. Its benefits include:
Hermes is now the default JavaScript engine for Android in React Native and increasingly recommended for production apps due to its optimized bytecode execution.
Native modules allow JavaScript to call custom platform-specific functionality. I will use them when:
Under the new architecture, native modules are written using TurboModules + JSI for better performance.
Fabric is the new concurrent rendering system in React Native. It introduces:
Fabric is part of the new architecture alongside JSI and TurboModules.
A senior developer must know:
Use React Navigation or native deep linking setups:
A senior developer typically combines:
Key components include:
Let's explore some of the most asked scenario-based react native interview questions and answers. These are designed to test your real-time troubleshooting skills.
I would first profile the application using Flipper, React DevTools Profiler, and Hermes Profiling to determine whether the bottleneck is caused by excessive JavaScript rendering, expensive native operations, or unnecessary component re-renders.
The optimization process would include:
A senior developer should rely on performance metrics rather than assumptions before making architectural changes.
An offline-first application should always treat local storage as the primary source of truth while synchronizing with the server whenever connectivity is restored.
A production-ready solution typically includes:
This architecture ensures users can continue working even without network access.
I would use an Over-the-Air (OTA) update solution such as Expo Updates or Microsoft CodePush (where applicable) to deliver JavaScript bundle updates without publishing a full application update.
Before implementing OTA updates, I would ensure that:
This approach significantly reduces deployment time for non-native changes.
Instead of manually managing API requests with useEffect, I would use React Query (TanStack Query) to handle server state efficiently.
The improvements would include:
React Query reduces boilerplate while improving both application performance and user experience.
Rendering thousands of items simultaneously creates unnecessary memory usage and UI thread workload.
I would optimize the screen by:
These optimizations significantly reduce memory consumption while maintaining smooth scrolling, even for very large datasets.
These are some of the key interview questions for React Native. If you are preparing to switch jobs or get a job, then these React Native interview questions are sure to help. Keep learning and there is no stopping before reaching success. These interview questions are a brilliant way to ensure success in this rapidly growing industry.
Visual Studio Code (VS Code) is considered one of the best tools for this framework. Its robust features, extensive community support and excellent integration are the main reasons behind its popularity.
The choice for the best image type is not about a single one. There are many of them and each one is best in different cases. WebP is highly recommended for optimal compression, PNG for graphics with transparency and JPG for photographs.
Node 18 or newer.
React Native is used to build mobile applications for Android and iOS. It helps developers to create apps fast using a single codebase.
React Native is popular because it allows developers to build cross-platform apps using a single codebase, saving time and development cost.
Course Schedule
| Course Name | Batch Type | Details |
| Programming Courses | Every Weekday | View Details |
| Programming Courses | Every Weekend | View Details |